Web Apps Arch. + Flask + HTTP
Python Web Application Layers
Section titled “Python Web Application Layers”Python is a dominant language for web development (used by Instagram, Disqus, etc.). A production-grade backend consists of three distinct layers working together.
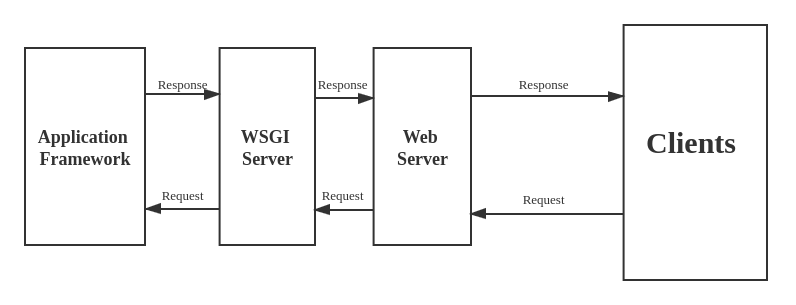
- Web Server Layer (Apache / Nginx): The frontline. It receives incoming HTTP requests from clients, serves static files (HTML, images, CSS) directly, and sends HTTP responses (with status codes) back to the client. Nginx and Apache are industry standards due to stability and security.
- WSGI Server Layer (Gunicorn / uWSGI): The bridge. Traditional web servers do not natively understand Python. The Web Server Gateway Interface (WSGI) is the standard interface that allows the web server to communicate with Python.
- Flexibility: Lowers coupling. You can swap your web server or your Python framework independently as long as both speak WSGI.
- Scaling: WSGI servers handle the heavy lifting of distributing load, maintaining multiple Python processes, and reacting to thousands of concurrent dynamic requests.
- Web Application Framework Layer (Django / Flask / FastAPI): The commercial logic. This layer abstracts away repetitive web development tasks (routing, ORM, user authentication, templating) so developers can focus purely on application-specific business logic.
Flask Framework Basics
Section titled “Flask Framework Basics”- Concept: A lightweight, highly popular Python web framework. It handles routing and backend logic with minimal boilerplate.
- Methods & Syntax:
Flask(__name__): Creates the WSGI application instance.__name__tells Flask where to look for resources like templates.@app.route('/'): A decorator that binds a specific URL endpoint to a Python function.
Program (Basic “Hello World”):
# --- File: start.py ---from flask import Flask
app = Flask(__name__)
@app.route('/')def hello():    # Returns raw text/HTML to the browser    return 'Hello, World!'
if __name__ == '__main__':    app.run()
Execution: Install via pip install flask, run python start.py, and open http://127.0.0.1:5000/.
Flask with Jinja2 Templates (Practical Implementation)
Section titled “Flask with Jinja2 Templates (Practical Implementation)”To render dynamic HTML instead of raw strings, Flask natively integrates with the Jinja2 templating engine.
Directory Structure:
Flask strictly requires HTML files to be placed in a folder named templates.
flask_project/├── app.py└── templates/ └── index.htmlProgram (app.py):
from flask import Flask, render_template
app = Flask(__name__)
@app.route('/user/<username>')def user_profile(username):    # Passes the Python variable into the Jinja template    return render_template('index.html', name=username)
if __name__ == '__main__':    app.run()
Program (templates/index.html):
<!DOCTYPE html><html><head> <title>Profile Page</title></head><body> <h1>Welcome to the portal, {{ name }}!</h1></body></html>HTTP Protocol & URL Formatting
Section titled “HTTP Protocol & URL Formatting”- Concept: The foundation of web communication. Actions are defined by specific HTTP methods.
- Core Methods:
- GET: Requests data from a specified resource.
- POST: Sends data to a server to create a resource. Calling it multiple times creates multiple resources.
- PUT: Sends data to a server to create or update a resource. It is idempotent: calling the exact same PUT request multiple times produces the exact same result without unintended side-effects.
- DELETE: Deletes the specified resource.
URL Anatomy:
- Protocol (Scheme): E.g.,
https:// - Host: The combination of subdomain + domain (e.g.,
api.example.com). - Resource Path: The specific route to the data (e.g.,
/path/to/resource). - Query String: Parameters passed to the URL, starting with
?and separated by&(e.g.,?p1=value&p2=value).
The Requests Library
Section titled “The Requests Library”-
Concept: The industry-standard, elegant HTTP library for Python. It vastly simplifies sending requests, handling authentication, and parsing JSON compared to built-in tools.
1. The Response Object
Section titled “1. The Response Object”Method / Property Description r.status_codeReturns the HTTP status integer (e.g., 200,404).r.json()Parses a JSON response into a Python dictionary/list. r.textReturns the raw response body as a string (Unicode). r.contentReturns the raw response body in bytes (for images/files). r.headersA case-insensitive dictionary of response headers. r.raise_for_status()Raises an exception if the status is a 4xx or 5xx error.
2. Downloading & Saving Files
Section titled “2. Downloading & Saving Files”When downloading files, use
stream=Trueto avoid loading the entire file into memory at once.r = requests.get('<https://example.com/file.zip>', stream=True)with open('local_file.zip', 'wb') as f:for chunk in r.iter_content(chunk_size=8192):f.write(chunk)3. Sending Data (POST/PUT)
Section titled “3. Sending Data (POST/PUT)”- Form Data: Use
data(sendsapplication/x-www-form-urlencoded). - JSON Data: Use
json(automatically setsContent-Typetoapplication/json).
# Sending a Formrequests.post('<https://httpbin.org/post>', data={'key': 'value'})# Sending JSONrequests.post('<https://httpbin.org/post>', json={'key': 'value'})4. Inspecting Headers & History
Section titled “4. Inspecting Headers & History”Useful for debugging redirects or verifying server metadata.
r = requests.get('<https://google.com>')print(r.headers['Content-Type']) # Get specific headerprint(r.history) # List of redirect responsesprint(r.cookies['session_id']) # Access cookies sent by server5. Timeouts & Sessions
Section titled “5. Timeouts & Sessions”Always use a timeout to prevent your script from hanging indefinitely. Use a Session to persist cookies and headers across multiple requests.
# Timeout (Seconds)requests.get('<https://api.com>', timeout=5)# Session (Persists headers/auth)s = requests.Session()s.headers.update({'x-test': 'true'})s.get('<https://httpbin.org/headers>') # Header is automatically included - Form Data: Use
Program (Execution & Evaluation):
import requests
response = requests.get('<https://api.github.com>')
# Direct status evaluationif response.status_code == 200:    print('Success!')elif response.status_code == 404:    print('Not Found.')
# Pythonic boolean evaluation (200-400 evaluates as True)if response:    print('Success!')else:    print('An error has occurred.')
Program (Authentication & Parameters): The library automatically formats query strings and headers.
import requests
# 1. Basic Authentication (Username / Password)requests.get('<https://api.github.com/user>', auth=('user', 'pass'))
# 2. Bearer Token Authenticationheaders = {'Authorization': 'Bearer myToken'}requests.get('<https://git.epam.com/api/v4/projects>', headers=headers)
# 3. URL Query Parameters (Automatically formats the ? and & syntax)payload = {'key1': 'value1', 'key2': 'value2'}r = requests.get('<https://some.org/obj>', params=payload)
print(r.url)# Output: <https://some.org/obj?key1=value1&key2=value2>
JSON Parsing Extraction Logic
Section titled “JSON Parsing Extraction Logic”When APIs return complex JSON structures, they are translated into nested Python Lists and Dictionaries. You navigate them using standard indexing.
Data Structure:
j = [{"name": "cat", "items": [{"num": 1, "price": 30}, {"num": 2, "price": 50}]}]Extraction Logic (Getting the price where num = 2):
result = j[0]["items"][1]["price"]print(result) # Output: 50Breakdown:
j[0]: Enters the first (and only) dictionary in the outer list.["items"]: Accesses the inner list using the key.[1]: Enters the second dictionary inside that inner list.["price"]: Extracts the final value.
(Note: While requests is the dominant third-party tool, Python does ship with urllib natively for URL handling. Documentation is available at docs.python.org/3/howto/urllib2.html, but requests is highly recommended for all modern implementations).