Tasks: Linux Networking
Task 1 - Static Routing & DHCP
Section titled “Task 1 - Static Routing & DHCP”Client-Server Network within a VirtualBox isolated environment.
- Network Type: VirtualBox “Internal Network” (Name:
net_x). - Server (VM1): A CentOS 9 machine acting as the Network Gateway. It has two interfaces: one for Internet (Bridge/NAT) and one for the internal lab (
10.0.0.1). →enp0s10 - Client (VM2): An Ubuntu/Debian machine (
pavan-client-a) that started with a static IP and is now transitioning to a dynamic setup. → interfaceenp0s3
Part A - Assign Static Routes to Server and Client
Section titled “Part A - Assign Static Routes to Server and Client”Server
→ sudo nmcli con add type ethernet con-name net_x ifname <INTERFACE> ipv4.addresses 10.0.0.1/24 ipv4.method manual
Connection ‘net_x’ (cea85d58-a74e-48f6-8a0d-00c4c3d29787) successfully added.
→ sudo nmcli con up net_x
Connection successfully activated (D-Bus active path: /org/freedesktop/NetworkManager/ActiveConnection/4)
Client
sudo nmcli con add type ethernet con-name net_x ifname <INTERFACE> ipv4.addresses 10.0.0.2/24 ipv4.method manual
→ sudo nmcli con up net_x
⇒ Check you can able to ping server from client..
also see this from client..
pavan@client-a:~$ ip a1: lo: <LOOPBACK,UP,LOWER_UP> mtu 65536 qdisc noqueue state UNKNOWN group default qlen 1000link/loopback 00:00:00:00:00:00 brd 00:00:00:00:00:00inet 127.0.0.1/8 scope host lovalid_lft forever preferred_lft foreverinet6 ::1/128 scope hostvalid_lft forever preferred_lft forever----------------------------------------**2: enp0s3: <BROADCAST,MULTICAST,UP,LOWER_UP> mtu 1500 qdisc fq_codel state UP group default qlen 1000link/ether 08:00:27:0c:40:b7 brd ff:ff:ff:ff:ff:ffinet 10.0.0.2/24 brd 10.0.0.255 scope global noprefixroute enp0s3valid_lft forever preferred_lft foreverinet6 fe80::3964:698b:8acc:a674/64 scope link noprefixroutevalid_lft forever preferred_lft forever**---------------------------------------
pavan@pavan-client-a:~$ ip r s10.0.0.0/24 dev enp0s3 proto kernel scope link src 10.0.0.2 metric 100169.254.0.0/16 dev enp0s3 scope link metric 1000
pavan@pavan-client-a:~$ ip neighbor show10.0.0.1 dev enp0s3 lladdr 08:00:27:3c:2e:3f REACHABLE
Part B - Assingn IP thorugh DHCP..
Section titled “Part B - Assingn IP thorugh DHCP..”Before that lets clean previous ip messup
Client
sudo nmcli con delete net_xsudo nmcli con add type ethernet con-name dhcp_lab ifname enp0s3 ipv4.method auto- new conn name is dhcp_lab
sudo ip addr flush dev enp0s3
server [CentOS]
→ install dhcp-server
→ start it and config here sudo nano /etc/dhcp/dhcpd.conf
# Global settingsdefault-lease-time 600;max-lease-time 7200;authoritative;
# The internal network segmentsubnet 10.0.0.0 netmask 255.255.255.0 {  range 10.0.0.10 10.0.0.100;      # Your requested range  option routers 10.0.0.1;          # Tells VM2 that VM1 is the gateway  option domain-name-servers 8.8.8.8;}
→ save it, then restart serveice.. sudo systemctl restart dhcpd
→ and run the following command on server see the live log of DORA REQUESTS FROM CLIENT..
sudo tail -f /var/log/messages | grep dhcpdFeb 18 23:32:22 epam dhcpd[7177]: No subnet declaration for enp0s3 (no IPv4 addresses).Feb 18 23:32:22 epam dhcpd[7177]: ** Ignoring requests on enp0s3. If this is not whatFeb 18 23:32:22 epam dhcpd[7177]: you want, please write a subnet declarationFeb 18 23:32:22 epam dhcpd[7177]: in your dhcpd.conf file for the network segmentFeb 18 23:32:22 epam dhcpd[7177]: to which interface enp0s3 is attached. **Feb 18 23:32:22 epam dhcpd[7177]:Feb 18 23:32:22 epam dhcpd[7177]: Sending on Socket/fallback/fallback-netFeb 18 23:32:22 epam dhcpd[7177]: Server starting service.Feb 18 23:32:44 epam dhcpd[7177]: DHCPREQUEST for 10.0.0.2 from 08:00:27:0c:40:b7 via enp0s10: unknown lease 10.0.0.2.Feb 18 23:32:46 epam dhcpd[7177]: DHCPREQUEST for 10.0.0.2 from 08:00:27:0c:40:b7 via enp0s10: unknown lease 10.0.0.2.Feb 18 23:32:52 epam dhcpd[7177]: DHCPREQUEST for 10.0.0.2 from 08:00:27:0c:40:b7 via enp0s10: unknown lease 10.0.0.2.Feb 18 23:33:06 epam dhcpd[7177]: DHCPDISCOVER from 08:00:27:0c:40:b7 via enp0s10Feb 18 23:33:07 epam dhcpd[7177]: DHCPOFFER on 10.0.0.50 to 08:00:27:0c:40:b7 (pavan-client-a) via enp0s10Feb 18 23:33:07 epam dhcpd[7177]: DHCPREQUEST for 10.0.0.50 (10.0.0.1) from 08:00:27:0c:40:b7 (pavan-client-a) via enp0s10Feb 18 23:33:07 epam dhcpd[7177]: DHCPACK on 10.0.0.50 to 08:00:27:0c:40:b7 (pavan-client-a) via enp0s10^Ccat /var/lib/dhcpd/dhcpd.leases# The format of this file is documented in the dhcpd.leases(5) manual page.# This lease file was written by isc-dhcp-4.4.2b1
# authoring-byte-order entry is generated, DO NOT DELETEauthoring-byte-order little-endian;
server-duid "\000\001\000\0011(\270\371\010\000'<.?";
lease 10.0.0.50 { starts 3 2026/02/18 18:03:07; ends 3 2026/02/18 18:13:07; cltt 3 2026/02/18 18:03:07; binding state active; next binding state free; rewind binding state free; hardware ethernet 08:00:27:0c:40:b7; client-hostname "pavan-client-a";}on the other side
then from client make connention up..
pavan@pavan-client-a:~$ sudo ip addr flush dev enp0s3pavan@pavan-client-a:~$ sudo nmcli con add type ethernet con-name dhcp_lab ipv4.method auto ifname enp0s3Connection 'dhcp_lab' (07bd16aa-443b-4d6c-90da-a2bbea3a92fa) successfully added.pavan@pavan-client-a:~$ sudo nmcli con up dhcp_labConnection successfully activated (D-Bus active path: /org/freedesktop/NetworkManager/ActiveConnection/13)pavan@pavan-client-a:~$ ip a1: lo: <LOOPBACK,UP,LOWER_UP> mtu 65536 qdisc noqueue state UNKNOWN group default qlen 1000 link/loopback 00:00:00:00:00:00 brd 00:00:00:00:00:00 inet 127.0.0.1/8 scope host lo valid_lft forever preferred_lft forever inet6 ::1/128 scope host valid_lft forever preferred_lft forever2: enp0s3: <BROADCAST,MULTICAST,UP,LOWER_UP> mtu 1500 qdisc fq_codel state UP group default qlen 1000 link/ether 08:00:27:0c:40:b7 brd ff:ff:ff:ff:ff:ff inet 10.0.0.50/24 brd 10.0.0.255 scope global dynamic noprefixroute enp0s3 valid_lft 592sec preferred_lft 592sec inet6 fe80::d1f7:9ac5:507f:c600/64 scope link noprefixroute valid_lft forever preferred_lft foreverSSH Key Process
Section titled “SSH Key Process”1. Generate Keys (Run on Both Clients)
Section titled “1. Generate Keys (Run on Both Clients)”This creates the public/private key pair. Press Enter through all prompts to accept the defaults (no passphrase).
`# On Client A ssh-keygen -t ed25519
On Client B
Section titled “On Client B”ssh-keygen -t ed25519`
2. Copy Keys to Server (Run on Both Clients)
Section titled “2. Copy Keys to Server (Run on Both Clients)”The ssh-copy-id command safely appends your public key to the server’s ~/.ssh/authorized_keys file with the correct permissions. It will ask for the server password one last time.
`# On Client A ssh-copy-id server@10.0.1.1
On Client B
Section titled “On Client B”ssh-copy-id server@10.0.2.1`
3. Verify the Keys
Section titled “3. Verify the Keys”Test the connection from both clients. If you get a command prompt immediately without typing a password, the keys are working.
ssh server@10.0.1.1 # (From Client A)
ssh server@10.0.2.1 # (From Client B)
4. Lock Down the Server (Run on Server)
Section titled “4. Lock Down the Server (Run on Server)”Now that the keys are proven to work, you can safely sever the password fallback.
-
Open the config:
sudo nano /etc/ssh/sshd_config -
Ensure this line is uncommented and set to
yes:PubkeyAuthentication yes -
Find this line, uncomment it, and set it to
no:PasswordAuthentication no -
Save and exit, then restart the daemon to apply the lock:
sudo systemctl restart sshd
The Deep Reasoning
Section titled “The Deep Reasoning”ed25519: We use this algorithm instead of RSA because it is faster, smaller, and highly secure.ssh-copy-id: Doing this manually (copying/pasting) often breaks because SSH is highly strictly about file permissions (chmod 700for~/.sshandchmod 600forauthorized_keys).ssh-copy-idhandles all that permission math for you.
Would you like to repeat this process to allow Client A and Client B to SSH directly into each other over your 172.0.0.x shortcut?
what we lost if restart all 3 machines…
Section titled “what we lost if restart all 3 machines…”1. Client A (The Target)
Section titled “1. Client A (The Target)”What you will lose:
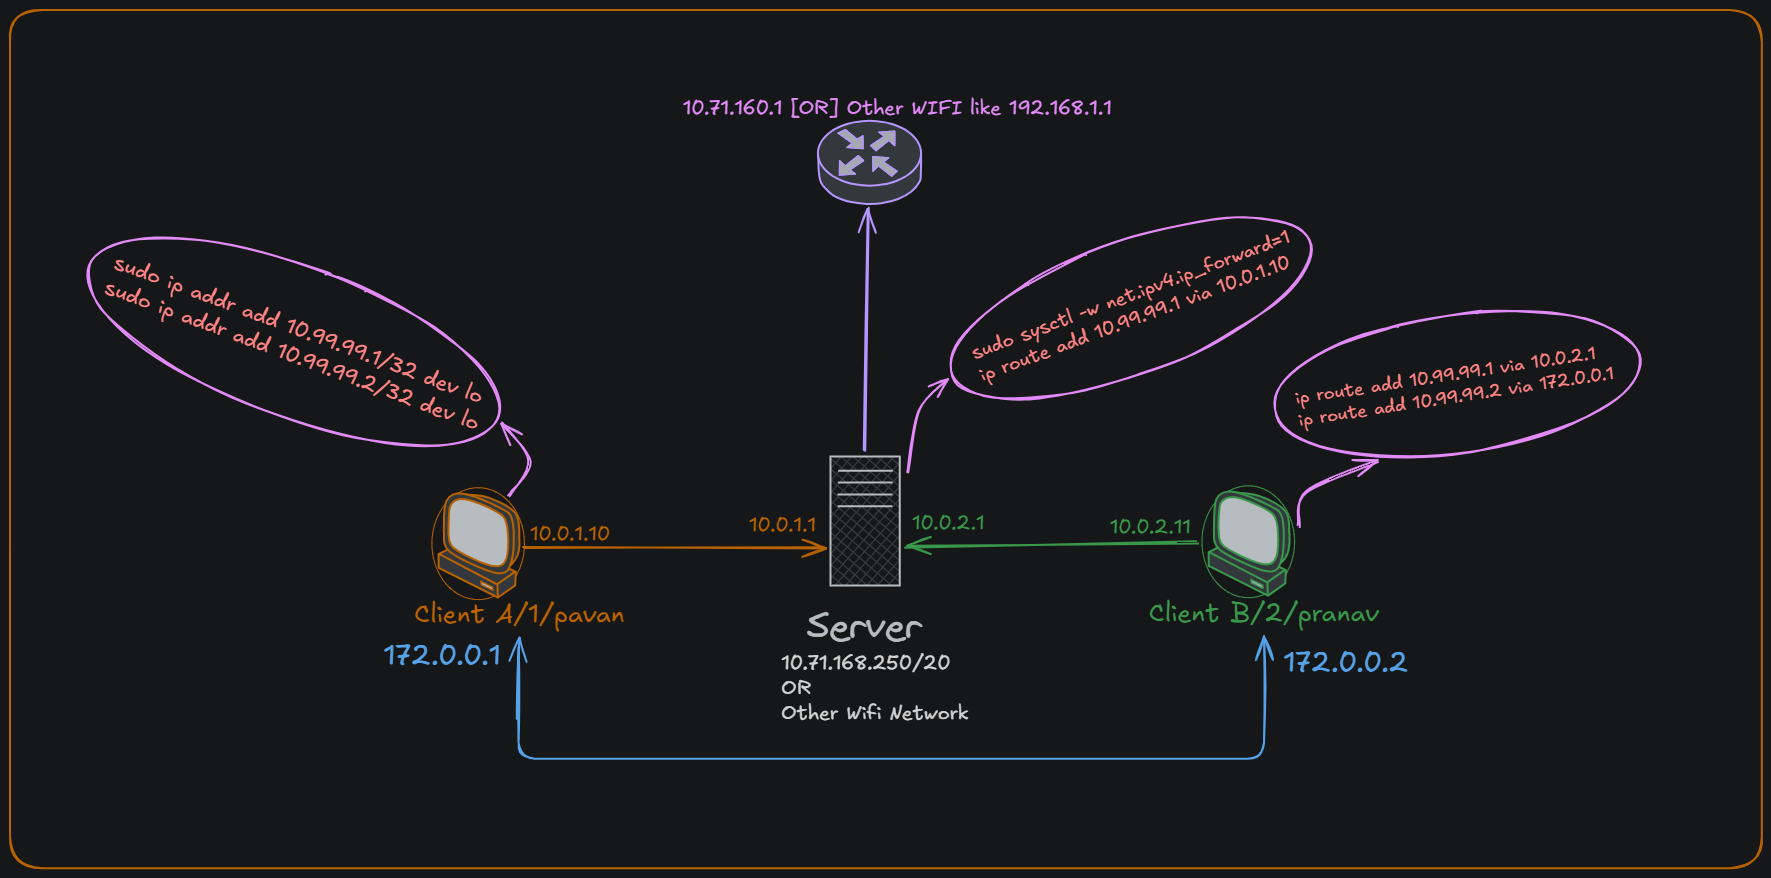
- Virtual IPs: Both
10.99.99.1and10.99.99.2will disappear from the loopback (lo) interface. - IP Address Change (Maybe): The
10.0.1.10address onenp0s3was assigned via DHCP. While DHCP servers often try to give clients the same IP they had previously, there is no guarantee unless you created a static DHCP reservation. You might get a new IP in the10.0.1.xrange.
What you will KEEP:
- The Shortcut Interface:
enp0s8will retain172.0.0.1because you configured it via NetworkManager (nmcli), which writes permanent config files to the disk.
2. Client B (The Sender)
Section titled “2. Client B (The Sender)”What you will lose:
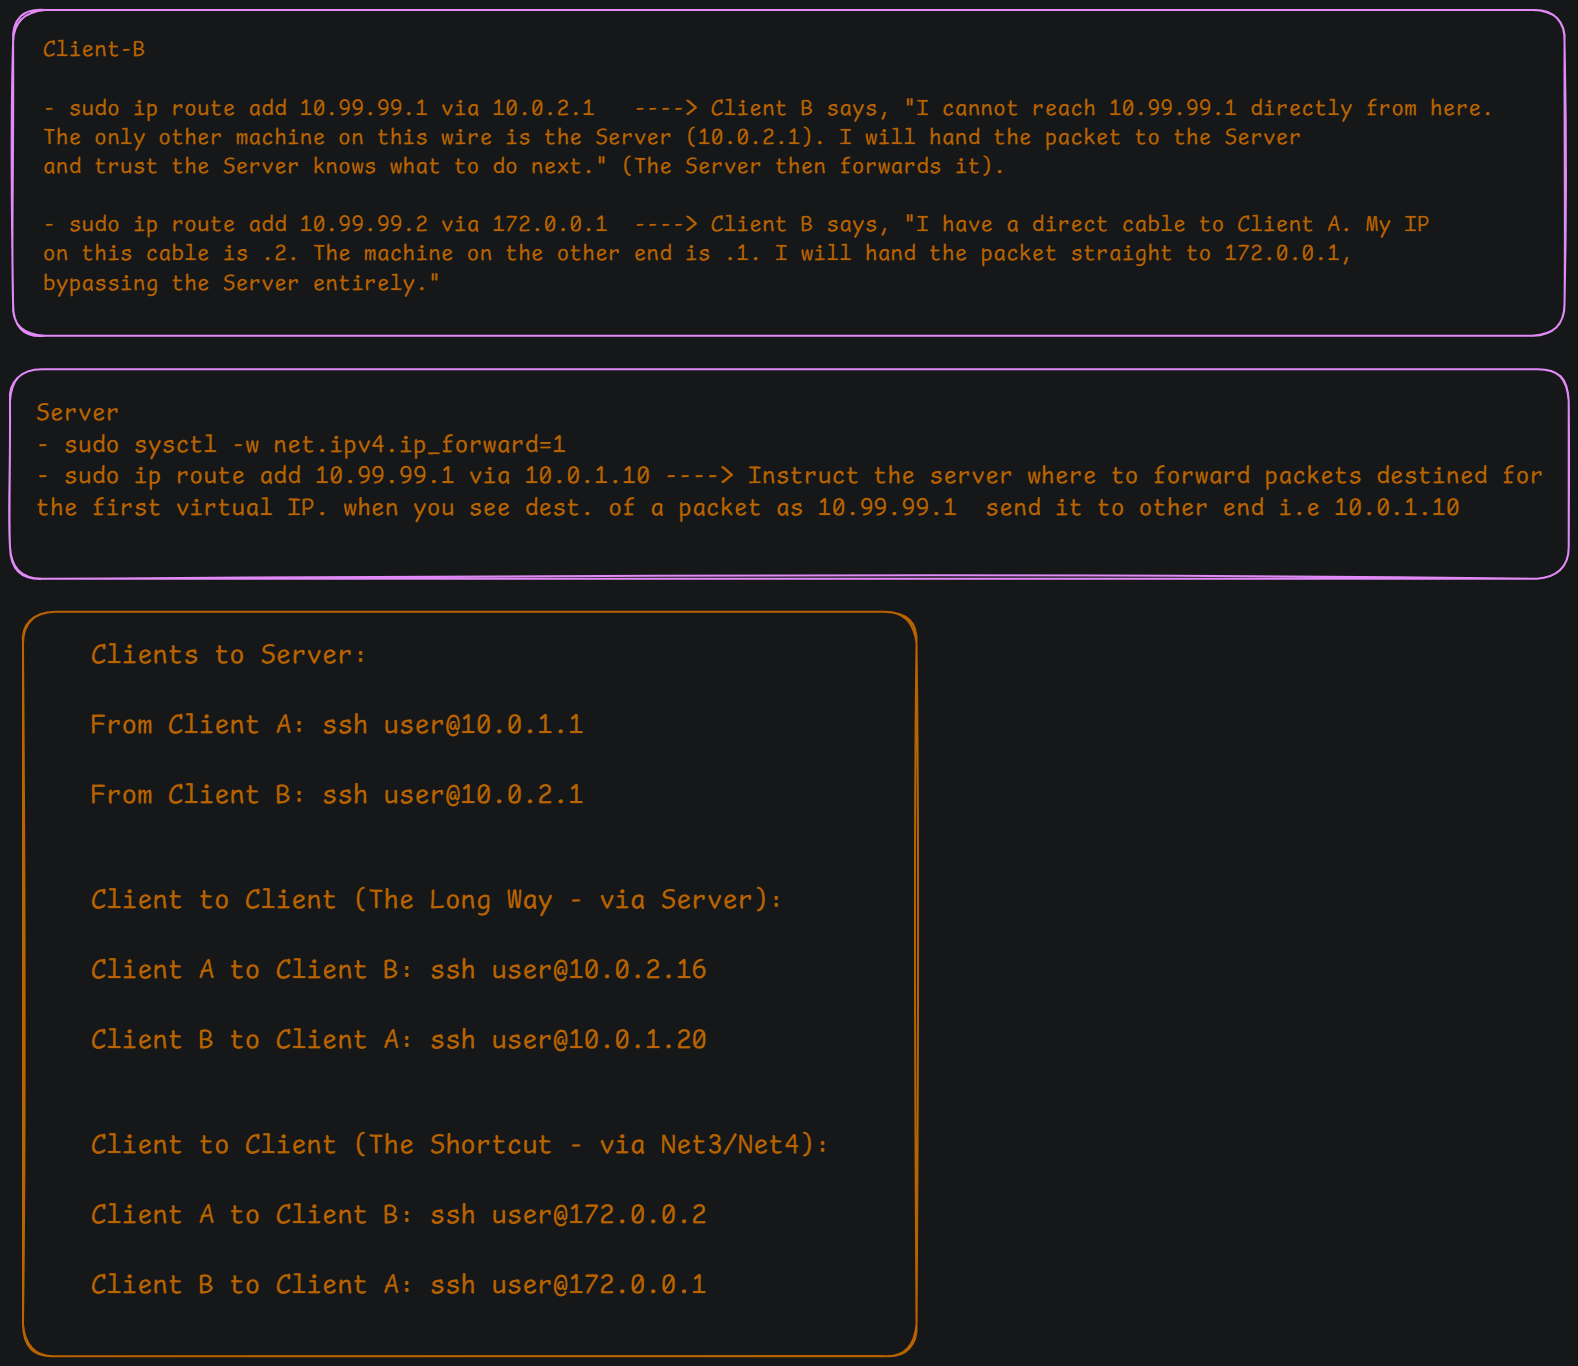
- Custom Route 1 (Server Path): The route telling Client B to send
10.99.99.1trafficvia 10.0.2.1will be erased. - Custom Route 2 (Shortcut Path): The route telling Client B to send
10.99.99.2trafficvia 172.0.0.1will be erased. - IP Address Change (Maybe): Similar to Client A,
10.0.2.11onenp0s3is a dynamic DHCP lease and could change.
What you will KEEP:
- The Shortcut Interface:
enp0s8will retain172.0.0.2due to NetworkManager.
3. The Server (The Router)
Section titled “3. The Server (The Router)”What you will lose:
- IP Forwarding: If you enabled IP forwarding using
sudo sysctl -w net.ipv4.ip_forward=1but did not write it to/etc/sysctl.confor/etc/sysctl.d/, the server will stop routing packets between Client A and Client B entirely. - Custom Routing: The explicit route
10.99.99.1 via 10.0.1.10 dev enp0s8will vanish. The server will no longer know how to find the virtual IP on Client A.
What you will KEEP:
- Main Interfaces: All IP assignments for
enp0s3(192.168.1.60),enp0s8(10.0.1.1), andenp0s9(10.0.2.1) will survive, as these are managed by NetworkManager.
The Restoration Plan
Section titled “The Restoration Plan”To bring your lab back to its current functional state after a reboot, you must execute the “volatile” commands again.
- Server: Re-enable IP forwarding (if it wasn’t made persistent) and re-add the route to
10.99.99.1(ensuring you use Client A’s new DHCP IP if it changed). - Client A: Re-assign the two
10.99.99.xIPs to thelointerface. - Client B: Re-add the two custom routes for
.1and.2(updating the.1route’sviaaddress if the Server’s DHCP IP changed, though the Server’s IPs are static, so you are safe there).