Logical Volume Management [LVM]
What is LVM & Why Use It?
Section titled “What is LVM & Why Use It?”- Traditional partitioning strictly binds filesystems to physical disks (e.g.,
/dev/sda1). - Logical Volume Manager (LVM) creates an abstraction layer between physical hardware and the operating system.
Core Advantages:
- Zero-Downtime Expansion: Resize partitions on the fly without rebooting Server.
- Storage Pooling: Combine multiple physical disks into a single massive virtual drive.
- Snapshots: Create point-in-time backups for safe updates or data recovery.
- Agility: Easily allocate, shrink, or move storage as application needs change.
🏗️ LVM Architecture
Section titled “🏗️ LVM Architecture”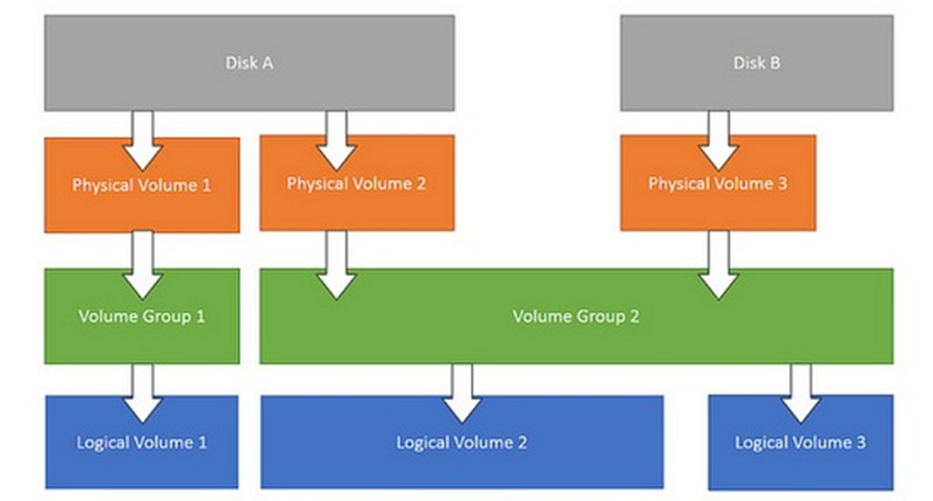
LVM operates in a strict, three-tier hierarchy:
Hardware Disk → Physical Volume (PV) → Volume Group (VG) → Logical Volume (LV) → Filesystem
- Physical Volumes (PV): The raw building blocks. These are physical disks (e.g.,
/dev/sdb) or standard partitions initialized for LVM use. - Volume Groups (VG): The storage pool. PVs are grouped together to create a single, large storage reservoir. Logic: Always leave some unallocated free space in a VG for future snapshots or LV expansion.
- Logical Volumes (LV): The usable partitions. Carved out of the VG, these act as virtual hard drives that you format (ext4, xfs) and mount to your directory structure.
1️⃣ Physical Volume (PV)
Section titled “1️⃣ Physical Volume (PV)”A Physical Volume is:
- A whole disk (e.g.
/dev/sdb) - OR a partition (e.g.
/dev/sdb1) - Initialized for LVM
Create a PV
Section titled “Create a PV”sudo pvcreate /dev/sdbView PVs
Section titled “View PVs”sudo pvsDetailed:
sudo pvdisplay2️⃣ Volume Group (VG)
Section titled “2️⃣ Volume Group (VG)”A Volume Group:
- Combines one or more PVs
- Acts like a storage pool
Create VG
Section titled “Create VG”sudo vgcreate my_vg /dev/sdbAdd another disk to existing VG:
sudo vgextend my_vg /dev/sdcView VGs
Section titled “View VGs”sudo vgsDetailed:
sudo vgdisplay3️⃣ Logical Volume (LV)
Section titled “3️⃣ Logical Volume (LV)”A Logical Volume:
- Created inside a VG
- Works like a normal partition
- You format and mount it
Create LV (10GB)
Section titled “Create LV (10GB)”sudo lvcreate -L 10G -n my_lv my_vgOr use all free space:
sudo lvcreate -l 100%FREE -n my_lv my_vgView LVs
Section titled “View LVs”sudo lvsDetailed:
sudo lvdisplay📦 Format and Mount Logical Volume
Section titled “📦 Format and Mount Logical Volume”After creating LV:
Format
Section titled “Format”sudo mkfs.ext4 /dev/my_vg/my_lvCreate mount directory
Section titled “Create mount directory”sudo mkdir /mnt/mydatasudo mount /dev/my_vg/my_lv /mnt/mydataPermanent mount (fstab)
Section titled “Permanent mount (fstab)”Add to /etc/fstab:
/dev/my_vg/my_lv /mnt/mydata ext4 defaults 0 0📈 Resizing in LVM (🔥)
Section titled “📈 Resizing in LVM (🔥)”This is why LVM is powerful.
🔼 Extend Logical Volume
Section titled “🔼 Extend Logical Volume”1️⃣ Extend LV by 5GB
Section titled “1️⃣ Extend LV by 5GB”sudo lvextend -L +5G /dev/my_vg/my_lv2️⃣ Resize filesystem
Section titled “2️⃣ Resize filesystem”For ext4:
sudo resize2fs /dev/my_vg/my_lvFor xfs:
sudo xfs_growfs /mnt/mydata🔽 Reduce Logical Volume (Careful ⚠️)
Section titled “🔽 Reduce Logical Volume (Careful ⚠️)”⚠️ Always shrink filesystem first.
1️⃣ Unmount
Section titled “1️⃣ Unmount”sudo umount /mnt/mydata2️⃣ Check filesystem
Section titled “2️⃣ Check filesystem”sudo e2fsck -f /dev/my_vg/my_lv3️⃣ Shrink filesystem
Section titled “3️⃣ Shrink filesystem”sudo resize2fs /dev/my_vg/my_lv 5G4️⃣ Reduce LV
Section titled “4️⃣ Reduce LV”sudo lvreduce -L 5G /dev/my_vg/my_lv📸 LVM Snapshots
Section titled “📸 LVM Snapshots”Used for:
- Backups
- Safe upgrades
- Testing changes
Create Snapshot
Section titled “Create Snapshot”sudo lvcreate -L 2G -s -n my_snapshot /dev/my_vg/my_lvRemove Snapshot
Section titled “Remove Snapshot”sudo lvremove /dev/my_vg/my_snapshot🗑️ Remove LVM Components
Section titled “🗑️ Remove LVM Components”Remove LV
Section titled “Remove LV”sudo lvremove /dev/my_vg/my_lvRemove VG
Section titled “Remove VG”sudo vgremove my_vgRemove PV
Section titled “Remove PV”sudo pvremove /dev/sdb| Category | Command | Purpose |
|---|---|---|
| Monitoring/Info | lsblk | List block devices and their tree structure. |
pvs / vgs / lvs | Quick summary of PVs, VGs, or LVs. | |
pvdisplay / vgdisplay / lvdisplay | Detailed metadata for PVs, VGs, or LVs. | |
watch -n 2 df -h | Continuously monitor disk space every 2 seconds. | |
blkid <path> | Get the UUID of a block device (needed for fstab). | |
| Physical Volumes | pvcreate <disk> | Initialize disk for LVM use. |
pvremove <disk> | Wipe LVM metadata from a disk. | |
| Volume Groups | vgcreate <name> <pv> | Create a new pool from physical volume(s). |
vgextend <name> <pv> | Add a new physical disk to an existing pool. | |
vgremove <name> | Delete a volume group. | |
| Logical Volumes | lvcreate -L 5G -n <name> <vg> | Create a new logical volume. |
lvextend -L +5G <lv_path> | Increase LV size by 5GB. | |
lvextend -l +100%FREE <lv> -r | Use all free VG space AND automatically resize filesystem. | |
lvreduce -L 5G <lv_path> | Shrink LV size to 5GB (Shrink FS first!). | |
lvchange -an <lv> / -ay <lv> | Deactivate (-an) or Activate (-ay) an LV. | |
lvremove <lv_path> | Delete a logical volume. | |
| Filesystems | mkfs.ext4 <lv_path> | Format the LV with the ext4 filesystem. |
mount <lv_path> <mount_dir> | Mount the filesystem to a directory. | |
umount <mount_dir> | Unmount the filesystem. | |
mount -a | Test /etc/fstab configuration to ensure safe reboots. | |
resize2fs <lv_path> | Expand/shrink ext4 filesystem to match LV size. | |
e2fsck -f <lv_path> | Force check filesystem for errors (required before shrinking). | |
| Snapshots | lvcreate -s -L 1G -n <name> <lv> | Create a 1GB point-in-time snapshot. |
lvconvert --merge <snap_path> | Rollback the original LV to the snapshot’s state. | |
| Testing/Utils | cat /dev/zero > <file> | Fill a file with zeros to test 100% disk usage. |
truncate -s 0 <file> | Empty a file instantly to free space. | |
apt clean | Clear local package cache to free emergency space. | |
Simple Notes
Section titled “Simple Notes”Core Workflow: Creating LVM Storage
Section titled “Core Workflow: Creating LVM Storage”Step 1: Initialize Physical Volumes: sudo pvcreate /dev/sdb /dev/sdc
Step 2: Pool into a Volume Group: sudo vgcreate data_vg /dev/sdb /dev/sdc
Step 3: Carve out a Logical Volume
# Create a specific size LVsudo lvcreate -L 10G -n my_lv data_vg
# OR use 100% of the available free spacesudo lvcreate -l 100%FREE -n my_lv data_vg
Step 4: Format and Mount
sudo mkfs.ext4 /dev/data_vg/my_lvsudo mkdir -p /mnt/mydatasudo mount /dev/data_vg/my_lv /mnt/mydata(To make permanent, add to /etc/fstab: /dev/data_vg/my_lv /mnt/mydata ext4 defaults 0 0)
Resizing Operations (The Power of LVM)
Section titled “Resizing Operations (The Power of LVM)”1. Resize Volume Group (VG)
Section titled “1. Resize Volume Group (VG)”-
Scenario A: Adding a new disk to
vg_1Terminal window # Initialize the new disksudo pvcreate /dev/nvme4n1# Extend the Volume Groupsudo vgextend vg_1 /dev/nvme4n1 -
Scenario B: Resizing an existing EBS volume If you increased from 50GB to 70GB in AWS:
Terminal window # Update LVM metadata to recognize the new physical sizesudo pvresize /dev/nvme1n1
2. Resize Logical Volume (LV)
Section titled “2. Resize Logical Volume (LV)”- Extending Storage (Safe & Online)
- Add underlying space (if VG is full):
sudo vgextend data_vg /dev/sdd - Extend the LV:
sudo lvextend -L +5G /dev/data_vg/my_lv(orl +100%FREEto use all space). - Extend the Filesystem to match:
sudo resize2fs /dev/data_vg/my_lv(Usexfs_growfsfor XFS).
- Add underlying space (if VG is full):
# 1. Extend the LVsudo lvextend -L +10G /dev/vg_1/lv_data1
# 2. Resize the Filesystem (Online)# For XFS (Amazon Linux default):sudo xfs_growfs /mnt/data1
# For EXT4:# sudo resize2fs /dev/vg_1/lv_data1
# Check LV sizesudo lvs
# Check usable disk spacedf -h /mnt/data1-
Reducing Storage (High Risk ⚠️)
Rule: Always shrink the filesystem BEFORE shrinking the Logical Volume to prevent data corruption.
- Unmount:
sudo umount /mnt/mydata - Check File System:
sudo e2fsck -f /dev/data_vg/my_lv - Shrink File System:
sudo resize2fs /dev/data_vg/my_lv 5G - Shrink LV:
sudo lvreduce -L 5G /dev/data_vg/my_lv
- Unmount:
-
Permanent Mount
-
Update
/etc/fstabAppend these lines to the end of/etc/fstab:Terminal window /dev/vg_1/lv_data1 /mnt/data1 xfs defaults 0 0/dev/vg_2/lv_data2 /mnt/data2 xfs defaults 0 0 -
Verify the Configuration
Crucial Step: Test the fstab entries immediately. If there is a syntax error, the system may fail to boot.
Terminal window # Unmount current sessionssudo umount /mnt/data1 /mnt/data2# Attempt to mount everything defined in fstabsudo mount -a# Check if they are backdf -h | grep data -
Logic:
mount -areads the fstab file. If it returns no errors, your configuration is safe for reboot.
-
Snapshots & Recovery
Section titled “Snapshots & Recovery”Snapshots capture the exact state of an LV at a specific moment. They require free space in the VG.
- Create Snapshot:
sudo lvcreate -s -L 2G -n my_snap /dev/data_vg/my_lv - Restore Data (Merge):
- Unmount original LV:
sudo umount /mnt/mydata - Merge snapshot:
sudo lvconvert --merge /dev/data_vg/my_snap - Reactivate LV:
sudo lvchange -ay /dev/data_vg/my_lv - Remount:
sudo mount /dev/data_vg/my_lv /mnt/mydata
- Unmount original LV:
Real-World & Interview Application
Section titled “Real-World & Interview Application”- Scenario: You have two 500GB drives, but need an 800GB database partition.
- LVM Logic: Initialize both as PVs -> Combine into one 1TB VG -> Create an 800GB LV -> Mount.
- Interview Question: “A production server’s disk is at 100%. How do you fix it without downtime?”
- Answer: Insert new disk ->
pvcreate->vgextend->lvextend->resize2fs. Total uptime maintained.