Files & File System
Unix/Linux
Section titled “Unix/Linux”- Supports a lot of file systems types: ext2, ext3, ext4, ReiserFS, etc.
- Single hierarchy (tree) concept used - there is one root directory (/), and every file existing on the system is located under it somewhere;
- There is no concept filename.extension - system doesn’t make any assumptions about the file content by its extension (extension is optional).
Windows
Section titled “Windows”- Supports NTFS, FAT16 & FAT32 file systems only
- Uses a drive letter abstraction - files are located on disks (or partitions) represented by letters (A:,B:,C:, … Z:)
- System behaviour related to file format and its content bases on it’s extension (.exe is executable file, .txt is a text file, etc).
Directory structure
Section titled “Directory structure”

/ ├── bin/ │ ├── ls │ ├── cp │ └── mv ├── boot/ │ ├── vmlinuz │ └── initrd.img ├── dev/ │ ├── sda │ └── tty1 ├── etc/ │ ├── passwd │ └── fstab ├── home/ │ ├── user1/ │ │ ├── Documents/ │ │ └── Downloads/ │ └── user2/ │ ├── Music/ │ └── Pictures/ ├── lib/ │ ├── libc.so │ └── libm.so ├── media/ │ ├── usb/ │ │ └── myfile.txt │ └── cdrom/ │ └── music.iso ├── opt/ │ └── custom_app/ │ └── app_file ├── proc/ │ ├── cpuinfo │ └── meminfo ├── root/ │ └── .bashrc ├── sbin/ │ ├── fdisk │ └── reboot ├── tmp/ │ └── tempfile.txt ├── usr/ │ ├── bin/ │ │ ├── python3 │ │ └── gcc │ └── lib/ │ ├── libpython3.so │ └── libgcc.so └── var/ ├── log/ │ └── syslog └── mail/ └── user1
Common Directories and Their Uses:
/bin: Essential command binaries (programs) that need to be available for the system to boot and run. Examples includels,cp,mv, etc./boot: Contains files necessary for booting the system, such as the Linux kernel and initial RAM disk image./dev: Contains device files. These are special files that represent hardware devices. For example,/dev/sdarepresents the first hard drive./etc: Contains system-wide configuration files. For example,/etc/passwdstores user account information./home: Contains user home directories. For example,/home/user1/is where the files for the useruser1are stored./lib: Contains shared libraries needed by programs in/binand/sbinto run. These are similar to DLLs in Windows./media: Mount points for removable media such as USB drives or CD/DVDs. For example,/media/usbcould be where your USB drive is mounted./mnt: A temporary mount point where file systems can be mounted manually./opt: Optional software packages installed by third-party vendors./proc: A virtual file system that provides information about the system and processes. For example,/proc/cpuinfocontains information about the CPU./root: The home directory for the root user (system administrator)./sbin: System binaries, which are used for system administration tasks. Examples includerebootandfdisk./tmp: Temporary files. These are files that are not meant to be kept for long-term storage./usr: Contains user programs and utilities. For example,/usr/bincontains most user-level programs./usr/local- contains all folders like / but contains data made by user, like user builded programs, installed packages etc…
/var: Contains variable data such as logs, mail, and spool files.
Mounting..
Section titled “Mounting..”Steps to Mount /dev/sr0 to /mnt/test:
Section titled “Steps to Mount /dev/sr0 to /mnt/test:”-
Check the Current Mount:
First, check where
/dev/sr0is already mounted to make sure it’s mounted:Terminal window mount | grep /dev/sr0This will show you the current mount point of
/dev/sr0. -
Unmount
/dev/sr0from Its Current Location:If
/dev/sr0is already mounted, you need to unmount it first before remounting it to a new location.Terminal window sudo umount /dev/sr0Alternatively, if it’s mounted to a specific directory, you can unmount it from that directory:
Terminal window sudo umount /media/cdrom # Example, replace with the actual mount point -
Create the New Mount Point:
If
/mnt/testdoesn’t already exist, you need to create it as a new directory:Terminal window sudo mkdir -p /mnt/test -
Mount
/dev/sr0to/mnt/test:After unmounting it from its original location, mount
/dev/sr0to the new mount point (/mnt/test):Terminal window sudo mount /dev/sr0 /mnt/test -
Verify the New Mount:
Verify that
/dev/sr0is now mounted at/mnt/test:Terminal window mount | grep /mnt/testThis will confirm that the partition is now mounted to
/mnt/test.
- The inode (index node) is a data structure in a Unix-style file system that describes a file-system object such as a file or a directory. Each inode stores the attributes and disk block location(s) of the object’s data. File-system object attributes may include metadata (times of last change, access, modification), as well as owner and permission data.
- Directories are lists of names assigned to inodes. A directory contains an entry for itself, its parent, and each of its children.
- An inode (Index Node) is a data structure on a filesystem that stores information about a file or a directory. This includes metadata such as:
- Who owns the file (UID).
- Permissions (Read/Write).
- Size.
- Pointers to the actual physical blocks on the disk where the data (the 1s and 0s) is hidden.
- Crucially: It does NOT store the filename.

Important: An inode does not store the file name or the file’s content—just metadata and pointers to the actual file data. Each file or directory in a filesystem has a unique inode.
The Directory: Think of a directory as a simple table that maps a human name to an Inode number.
my_script.sh-> Inode #555notes.txt-> Inode #999
What is a Filesystem?
Section titled “What is a Filesystem?”A filesystem is a method used by an operating system to organize, store, and manage files on a storage device (like a hard disk or SSD). A filesystem is created on a partition and defines how files are named, stored, and accessed.
- Examples of Filesystems: ext4, NTFS, FAT32, Btrfs, etc.
- Filesystem and Inodes: In a Linux filesystem (like ext4), inodes are used to represent and manage files and directories.
Hard Links vs Soft Links (Symbolic Links)
Section titled “Hard Links vs Soft Links (Symbolic Links)”1. Hard Links:
Section titled “1. Hard Links:”- Definition: A hard link is a direct reference to the inode of a file. Both the original file and the hard link point to the same data on the disk, making them indistinguishable.
- A Hard Link is just a new entry in that directory table pointing to the same Inode.
- Logic: If you create a hard link
link2forfile1, you now have two names pointing to Inode #555. - Result: They are identical. If you edit
link2, the Inode updates, sofile1changes too. - Deleting: If you delete
file1, the Inode #555 stays alive becauselink2is still pointing at it. The data only vanishes when the “Link Count” in the Inode hits zero.
- Logic: If you create a hard link
- Commands:
-
Create:
Terminal window ln original_file hard_link_fileExample:
Terminal window ln file1.txt file1_hardlink.txt -
Verify (check inodes of files):
Terminal window ls -i file1.txt file1_hardlink.txt- Both files will show the same inode number.
-
- Explanation: Hard links cannot span across different filesystems and cannot link to directories (except by the superuser). Both the original file and the hard link share the same inode and data.
- Use Case: Useful when you want multiple references to a file without duplicating the data (i.e., backups, multi-access).
2. Soft Links (Symbolic Links):
Section titled “2. Soft Links (Symbolic Links):”-
Definition: A soft link (or symlink) is a special file that points to another file or directory by name. It acts as a shortcut, but unlike hard links, symlinks can span across filesystems.
-
A Soft Link is a completely new file with its own Inode.
- Contents: Instead of pointing to an Inode number, the data inside a Soft Link is just a text string containing the path to another file (e.g.,
"/home/pavan/notes.txt"). - Logic: It’s like a Post-it note that says, “Go look at the shelf labeled ‘notes.txt’.”
- Contents: Instead of pointing to an Inode number, the data inside a Soft Link is just a text string containing the path to another file (e.g.,
-
a symbolic link (or symlink or soft link) is a pointer to a file name
-
if the original file is moved, the link becomes invalid
-
deleting the link does not delete the original file
-
if removed, the original file will remain
-
usually made to directories to create shortcuts
-
created with the -s option to ln or the symlink function
-
Create:
Terminal window **ln -s** **target_file symlink_file**Example:
Terminal window ln -s /home/user/file1.txt file1_symlink.txt -
Verify:
Terminal window ls -l file1_symlink.txt- Shows something like:
lrwxrwxrwx 1 user user 22 Apr 4 10:00 file1_symlink.txt -> /home/user/file1.txt.
- Shows something like:
-
Explanation: A symlink points to the path of the target file, not the inode. If the target is deleted or moved, the symlink becomes “broken” (i.e., it no longer works).
-
Use Case: Useful for creating shortcuts, linking files across different directories or filesystems, or simplifying access to complex paths.
Why Hard Links stay in one Partition?
Section titled “Why Hard Links stay in one Partition?”Now the “Big Picture” makes sense:
- Each partition (or USB) has its own Inode table.
- Partition 1 has an Inode #100 (a text file).
- Partition 2 (USB) has an Inode #100 (a movie).
- If you tried to make a hard link from Partition 1 to Partition 2, the Kernel would get confused. “Do you want Inode 100 on the Disk or Inode 100 on the USB?”
Because the Hard Link points to a raw number, and those numbers are only valid within their own “building” (partition), they cannot cross the gap. Soft Links work because they use paths (addresses), and the Head Librarian (Kernel) knows how to follow a path from one building to another.
Key Differences:
Section titled “Key Differences:”| Feature | Hard Link | Soft Link (Symbolic) |
|---|---|---|
| Reference | Points directly to the inode | Points to the filename/path |
| File System | Cannot span different filesystems | Can span across different filesystems |
| Target | Cannot link to directories (except root) | Can link to directories and files |
| Behavior if Target is Deleted | File still exists as long as one link remains | Becomes broken if target is deleted |
| Creation Command | ln <target> <link> | ln -s <target> <symlink> |

Sockets
Section titled “Sockets”Creating a Simple Socket: We will cover both communication on the same machine (local) and across different machines (network communication).
Communication on the Same Machine:
Section titled “Communication on the Same Machine:”-
Server (Listening for connections):
Terminal window nc -lU /tmp/mysocketnc(Netcat) creates a Unix domain socket at/tmp/mysocketand listens for incoming data.- The
lflag tellsncto listen for incoming connections. Uspecifies that we are using a Unix domain socket.
-
Client (Connecting to the socket and sending data):
Terminal window echo "Hello from client" | nc -U /tmp/mysocket- This sends the message “Hello from client” to the socket
/tmp/mysocketon the same machine.
Note: Data can flow both ways with a socket, so you could send and receive data in both the client and server commands.
- This sends the message “Hello from client” to the socket
Communication Across Different Machines (TCP/IP Socket):
Section titled “Communication Across Different Machines (TCP/IP Socket):”-
Server (Listening for TCP connections):
Terminal window nc -l 12345- Here, the server listens for TCP connections on port
12345.
- Here, the server listens for TCP connections on port
-
Client (Connecting to the server over TCP):
Terminal window echo "Hello from client" | nc <server-ip> 12345- Replace
<server-ip>with the actual IP address of the server machine. - This sends the message “Hello from client” to the server.
Now the server and client can send and receive data back and forth using sockets.
- Replace
Standard Pipe (|) – One-Way Communication:
Section titled “Standard Pipe (|) – One-Way Communication:”-
Example of using pipe in one terminal:
Terminal window echo"Hello from first command" | grep"Hello"- The
echocommand sends data through the pipe to thegrepcommand. grepprocesses the input and displays the result (“Hello from first command”).- This is one-way communication using the pipe (
|).
- The
Named Pipe (FIFO) – Custom Pipe (mkfifo):
Section titled “Named Pipe (FIFO) – Custom Pipe (mkfifo):”A named pipe (FIFO) allows for one-way communication, but it is more flexible and persists as a file in the filesystem, which can be accessed by multiple processes.
-
Create a Named Pipe:
Terminal window mkfifo /tmp/mypipe- This creates a named pipe (FIFO) called
/tmp/mypipethat can be used for communication.
- This creates a named pipe (FIFO) called
-
Writing Data to the Pipe (in one terminal):
Terminal window echo"Hello from one terminal" > /tmp/mypipe- This writes the string to the named pipe
/tmp/mypipe. The data will wait in the pipe until another process reads it.
- This writes the string to the named pipe
-
Reading Data from the Pipe (in another terminal):
Terminal window cat < /tmp/mypipe- This command reads the data from the pipe and displays it on the screen.
- The terminal will block and wait until data is written into the pipe.
Summary of Types of Pipes:
Section titled “Summary of Types of Pipes:”- Standard Pipe (
|):- One-way communication between processes.
- Example:
echo "Hello" | grep "Hello".
- Named Pipe (FIFO):
- One-way communication, but the pipe persists as a file in the filesystem.
- Example:
- Create with
mkfifo /tmp/mypipe. - Write with
echo "Hello" > /tmp/mypipe. - Read with
cat < /tmp/mypipe.
- Create with
| Feature | Pipes | Sockets |
|---|---|---|
| Directionality | One-way communication | Two-way (bidirectional) communication |
| Communication Scope | Works only within the same system | Supports communication across different systems and networks |
| Persistence | Temporary (standard pipes) or persistent (named pipes) | Persistent as long as the connection is open |
| Use Cases | Simple communication between local processes | Complex communication (e.g., client-server, network communication) |
| Creation | Created automatically (standard pipes), or manually using mkfifo (named pipes) | Created programmatically (e.g., nc, or socket APIs) |
-
find file type
find <FILE_NAME>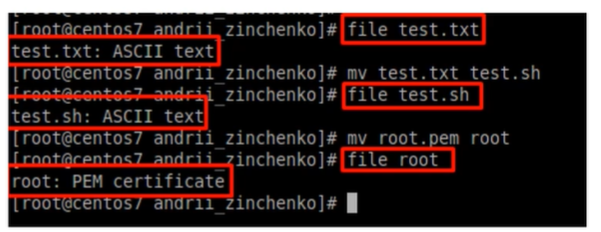

-
head abc.txt -n 5→ first 5 lines -
head abc.txt -c 10→ first 10 chars/bytes- same for tail command