SSH
SSH Arch.
Section titled “SSH Arch.”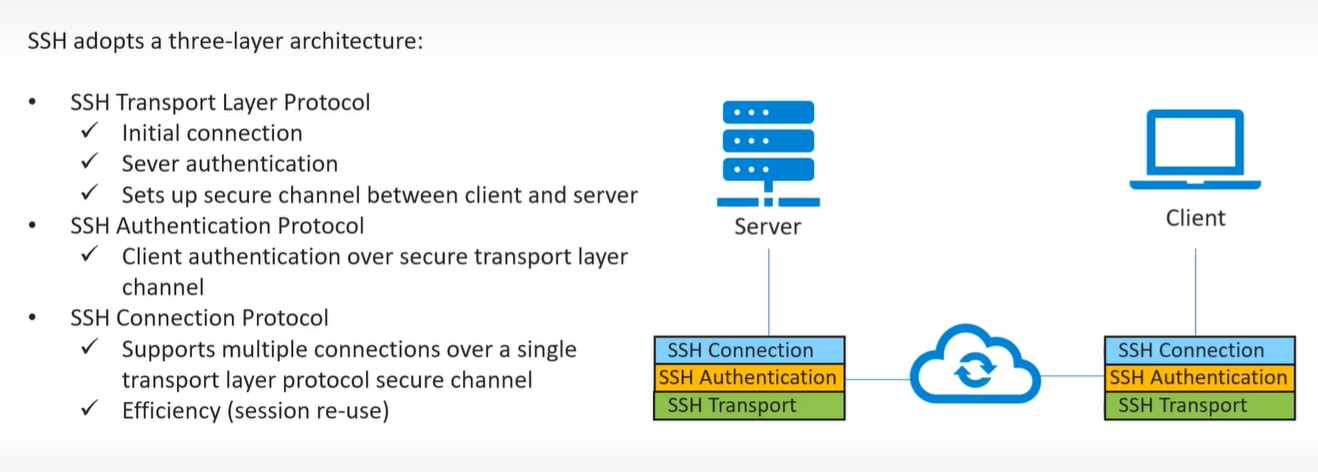
- uses TCP at transport layer
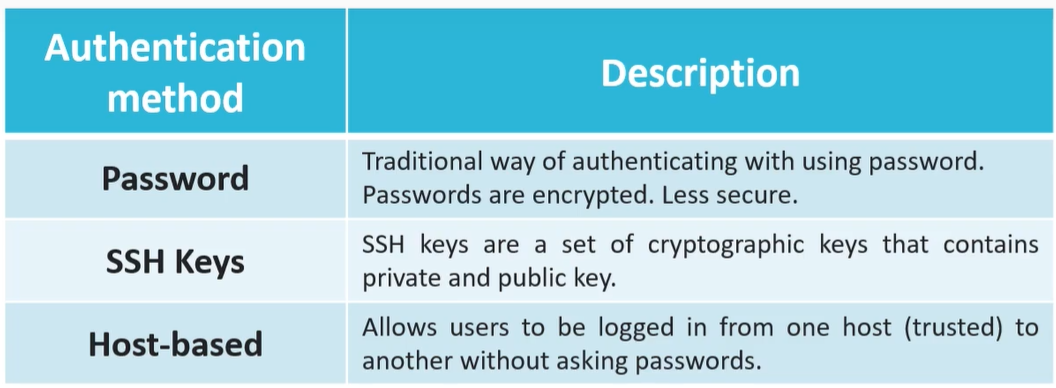
- using password - cleint need to enter server user password
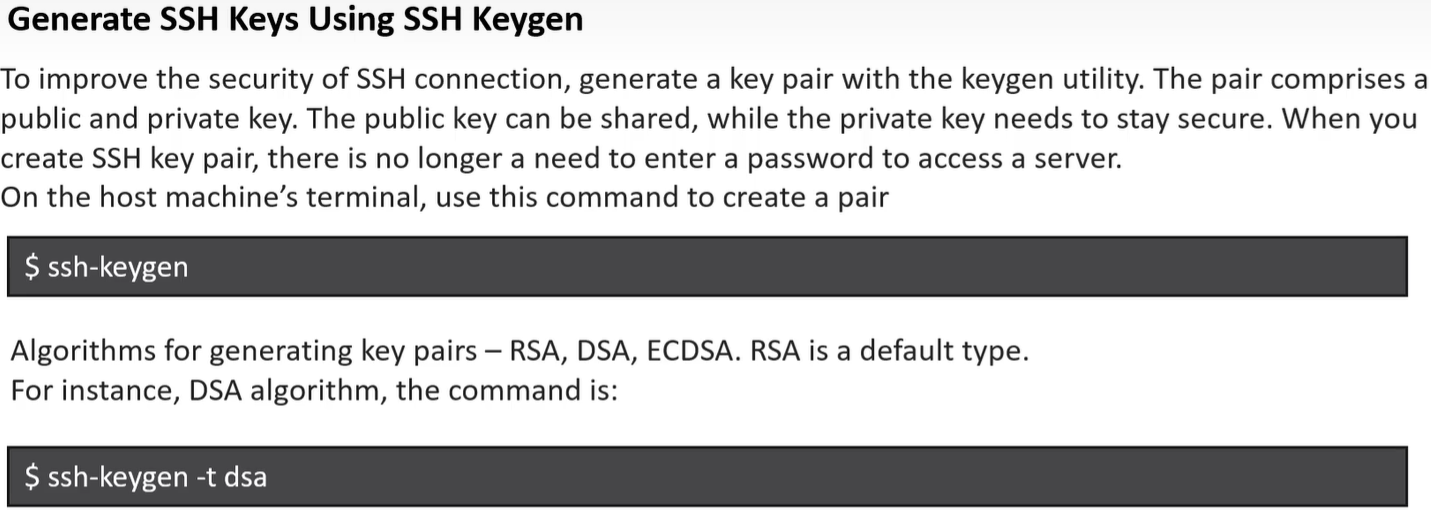
-
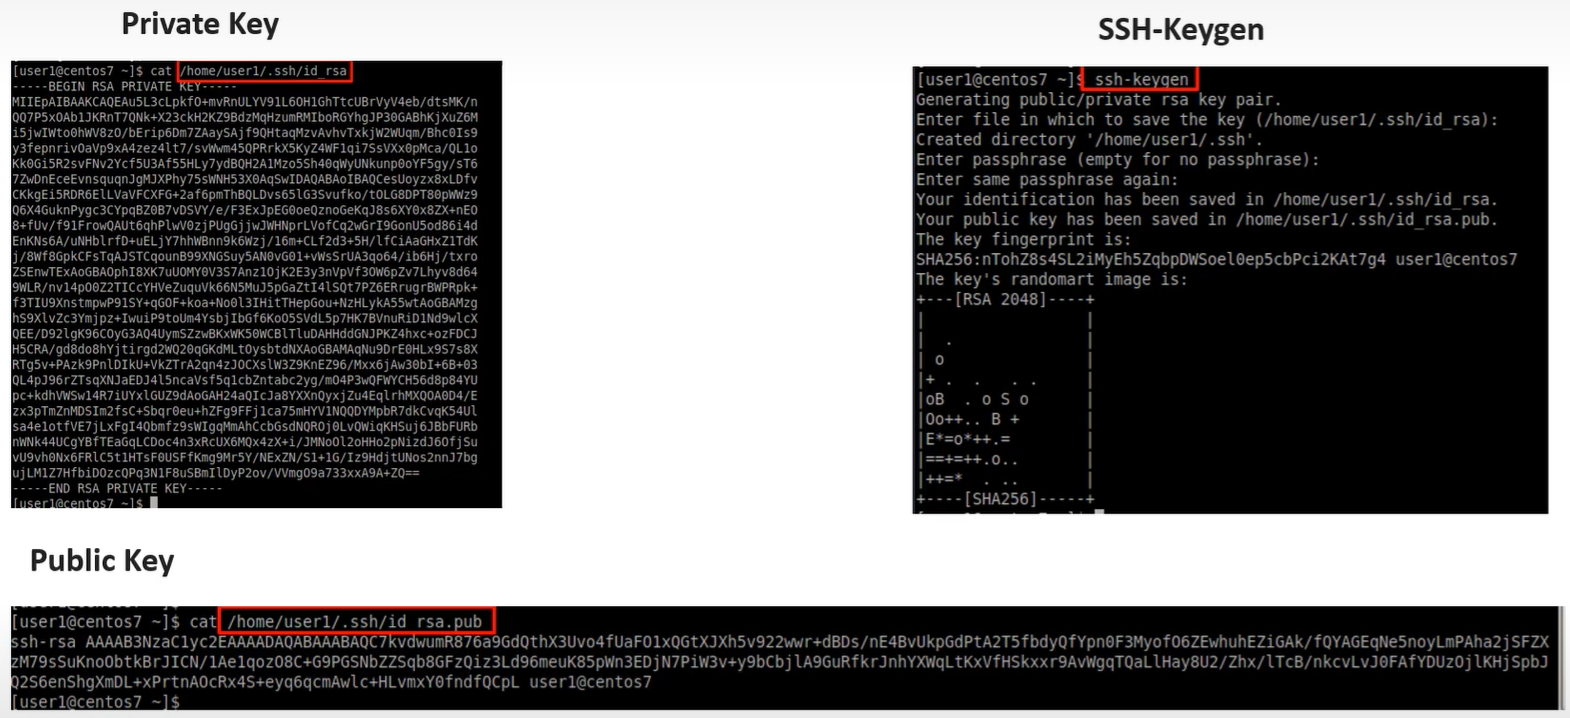
this command genrates a public and private key pairs
Key Pair Logic (The “Challenge-Response”)
Section titled “Key Pair Logic (The “Challenge-Response”)”Instead of sending a password over the wire, SSH uses a Public/Private key pair:
- Client connects to the server.
- Server checks
~/.ssh/authorized_keysfor a matching public key. - Server sends a “challenge” (random data).
- Client signs the challenge using its Private Key (which never leaves the client).
- Server verifies the signature with the Public Key.
Important: The private key never leaves the client. Only a challenge-response proof is sent.

1️⃣ Step 1: Confirm SSH is running on CentOS
Section titled “1️⃣ Step 1: Confirm SSH is running on CentOS”In your CentOS VM:
sudo systemctlenable sshdsudo systemctl start sshdsudo systemctl status sshd- Make sure it says
active (running)✅
Check the default port:
grep Port /etc/ssh/sshd_configDefault: 22
2️⃣ Step 2: Find the VM’s IP (inside NAT mode)
Section titled “2️⃣ Step 2: Find the VM’s IP (inside NAT mode)”NAT mode does not give the VM a public IP.
- You cannot directly use the VM’s internal IP from Windows.
Solution: Port Forwarding in VirtualBox.
Step 2a: Set up Port Forwarding
Section titled “Step 2a: Set up Port Forwarding”- Power off the VM.
- Go to VirtualBox → VM Settings → Network → Adapter 1 → NAT → Advanced → Port Forwarding.
- Add a rule like:
| Name | Protocol | Host IP | Host Port | Guest IP | Guest Port |
|---|---|---|---|---|---|
| SSH | TCP | 127.0.0.1 | 2222 | 10.0.2.15 | 22 |
- Host IP:
127.0.0.1→ only accessible from Windows host - Host Port:
2222→ the port you’ll connect to on Windows - Guest IP: leave blank or use VM internal IP (usually
10.0.2.15) - Guest Port:
22→ SSH port inside VM
Start the VM after saving.
3️⃣ Step 3: Generate SSH key on Windows
Section titled “3️⃣ Step 3: Generate SSH key on Windows”On Windows 11:
- Open PowerShell or Windows Terminal
- Run:
ssh-keygen-t rsa-b4096- Save to default location:
C:\Users\<username>\.ssh\id_rsa - Optionally add a passphrase
This creates:
- Private key:
id_rsa - Public key:
id_rsa.pub
4️⃣ Step 4: Copy public key to CentOS VM
Section titled “4️⃣ Step 4: Copy public key to CentOS VM”Inside Windows PowerShell:
type$env:USERPROFILE\.ssh\id_rsa.pub- Copy the output (the full line starting with
ssh-rsa)
On CentOS VM:
mkdir -p ~/.sshecho"<paste-public-key-here>" >> ~/.ssh/authorized_keyschmod 700 ~/.sshchmod 600 ~/.ssh/authorized_keysThis registers your Windows key on the CentOS VM.
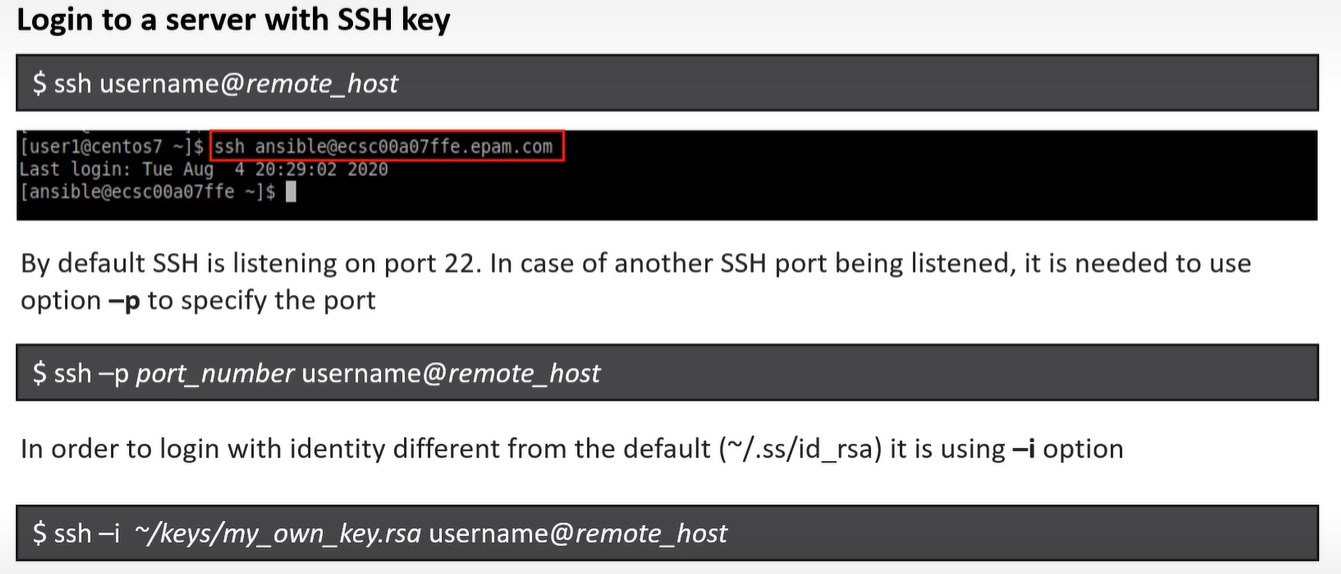
5️⃣ Step 5: Connect from Windows to CentOS VM
Section titled “5️⃣ Step 5: Connect from Windows to CentOS VM”Back in Windows PowerShell:
ssh-p2222 <centos-username>@127.0.0.1p 2222→ the forwarded port from NAT- Username → your CentOS account
You should get in without typing the VM password if the key works.
✅ Step 6: Optional tweaks
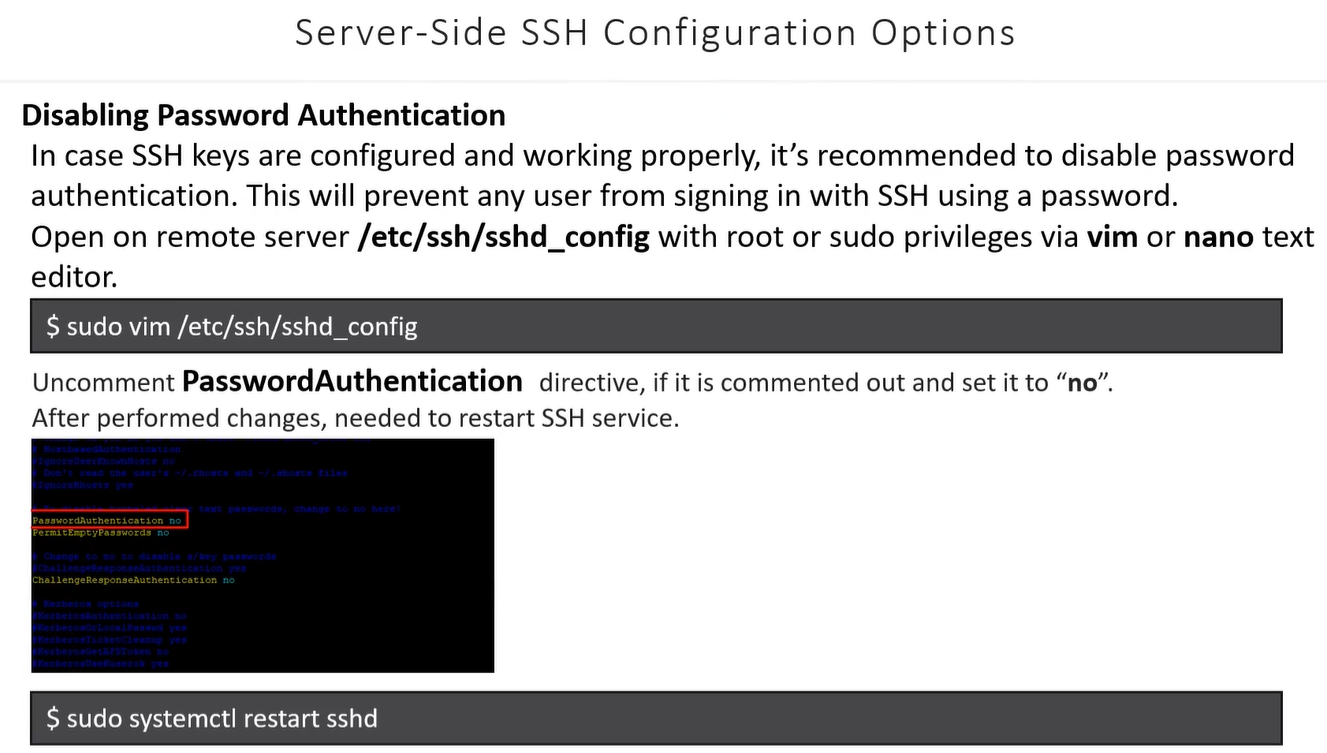
Section titled “✅ Step 6: Optional tweaks”- Disable password login (for security) on CentOS:
sudo nano /etc/ssh/sshd_config# set PasswordAuthentication nosudo systemctl restart sshd- Make sure firewall allows SSH:
sudo firewall-cmd --add-service=ssh --permanentsudo firewall-cmd --reloadEven in NAT mode, port forwarding handles the connection, so firewall won’t block it if you forwarded 2222.
Essential Commands & File Management
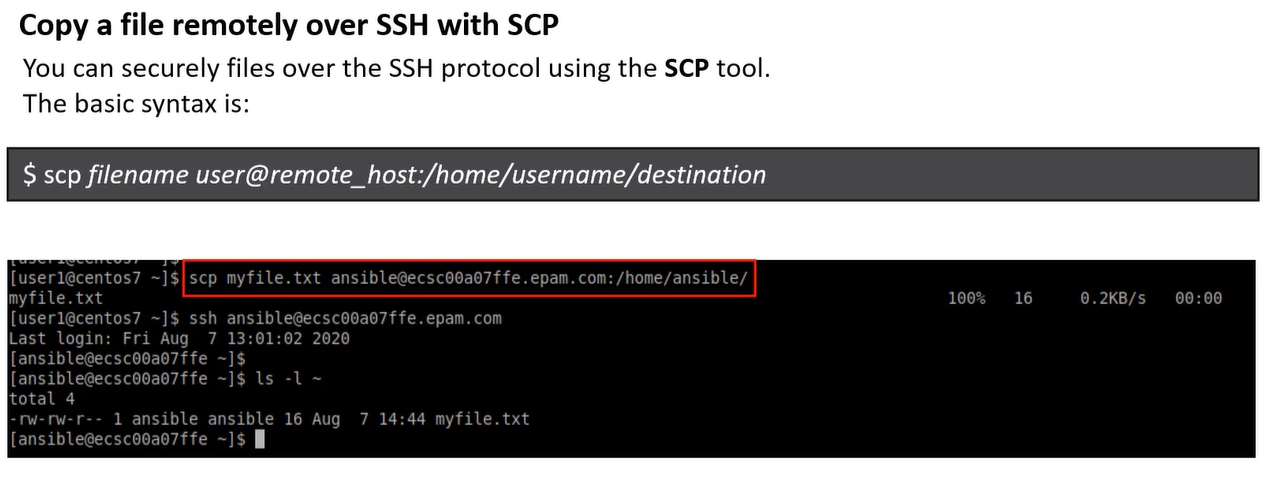
Section titled “Essential Commands & File Management”SCP (Secure Copy)
Section titled “SCP (Secure Copy)”Uses the SSH protocol to move files between hosts.
- Push (Local to Remote):
scp file.txt user@host:/path/to/dest - Pull (Remote to Local):
scp user@host:/path/to/file.txt . - Recursive (Folders):
scp -r folder/ user@host:/path/
SSH Command Flags
Section titled “SSH Command Flags”i: Specify identity file (private key location).p: Connect to a non-standard port.t: Force pseudo-terminal (required forsudocommands on remote hosts).N: Do not execute a command (useful only for port forwarding).
Bastion Hosts (The “Jump” Server)
Section titled “Bastion Hosts (The “Jump” Server)”A Bastion Host (or Jump Box) is a server in a public subnet that acts as a single point of entry to a private network.
Accessing Private Instances
Section titled “Accessing Private Instances”To reach a private server through a bastion, use the ProxyCommand:
ssh -i private.pem -o "ProxyCommand ssh -W %h:%p -i bastion.pem user@bastion-ip" user@private-ip
%h:%p: Tells the bastion to forward the connection to the destination host and port.
Simplifying Connections: SSH Config File
Section titled “Simplifying Connections: SSH Config File”If you have multiple servers with different keys/ports, create a config file at ~/.ssh/config to avoid long commands.
Example Entry:
Host my-server HostName 192.168.1.10 User pavan Port 2222 IdentityFile ~/.ssh/id_rsa
Usage: Simply type ssh my-server instead of the full string.
SFTP & Chroot (Secure File Transfer)
Section titled “SFTP & Chroot (Secure File Transfer)”SFTP is a secure alternative to FTP. You can “lock” (Chroot) users into a specific directory for security.
Configuration (/etc/ssh/sshd_config):
Match User sftpuser ForceCommand internal-sftp ChrootDirectory /var/sftp PasswordAuthentication yes AllowTcpForwarding no
- Effect: When
sftpuserlogs in, they see/var/sftpas their root directory and cannot browse the rest of the system.
Updated Lab: Port Forwarding & Remote Execution
Section titled “Updated Lab: Port Forwarding & Remote Execution”Using your NAT Port Forwarding (Host Port 2222 -> Guest Port 22) setup:
1. Remote Command Execution
Section titled “1. Remote Command Execution”You don’t need to log in to run a command. Use your forwarded port:
PowerShell
`# Single command ssh -p 2222 user@127.0.0.1 “ls -l /tmp”
Script execution (Run local script on remote VM)
Section titled “Script execution (Run local script on remote VM)”ssh -p 2222 user@127.0.0.1 < local_script.sh`
2. Moving Files with SCP
Section titled “2. Moving Files with SCP”If you need to move your awscliv2.zip from Windows to CentOS:
scp -P 2222 C:\path\to\awscliv2.zip user@127.0.0.1:~/Downloads/
(Note: SCP uses uppercase -P for the port, while SSH uses lowercase -p).
3. Security Hardening
Section titled “3. Security Hardening”After your keys are working, always disable password logins in /etc/ssh/sshd_config:
- Set
PasswordAuthentication no. - Set
PubkeyAuthentication yes. - Set
PermitRootLogin no. - Restart:
sudo systemctl restart sshd.