File System, Mounts, Drivers
Docker Storage and File Systems
Section titled “Docker Storage and File Systems”-
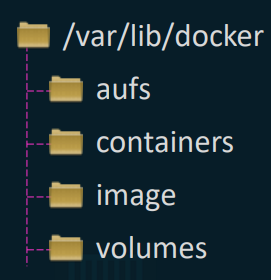
Default Location: When installed, Docker creates its primary working directory at
/var/lib/dockeron the local host. -
Directory Structure:
containers/: Stores files strictly related to active or stopped containers.images/: Stores the pulled or built read-only image layers.volumes/: Stores persistent data managed natively by Docker.
Docker Layered Architecture
Section titled “Docker Layered Architecture”-
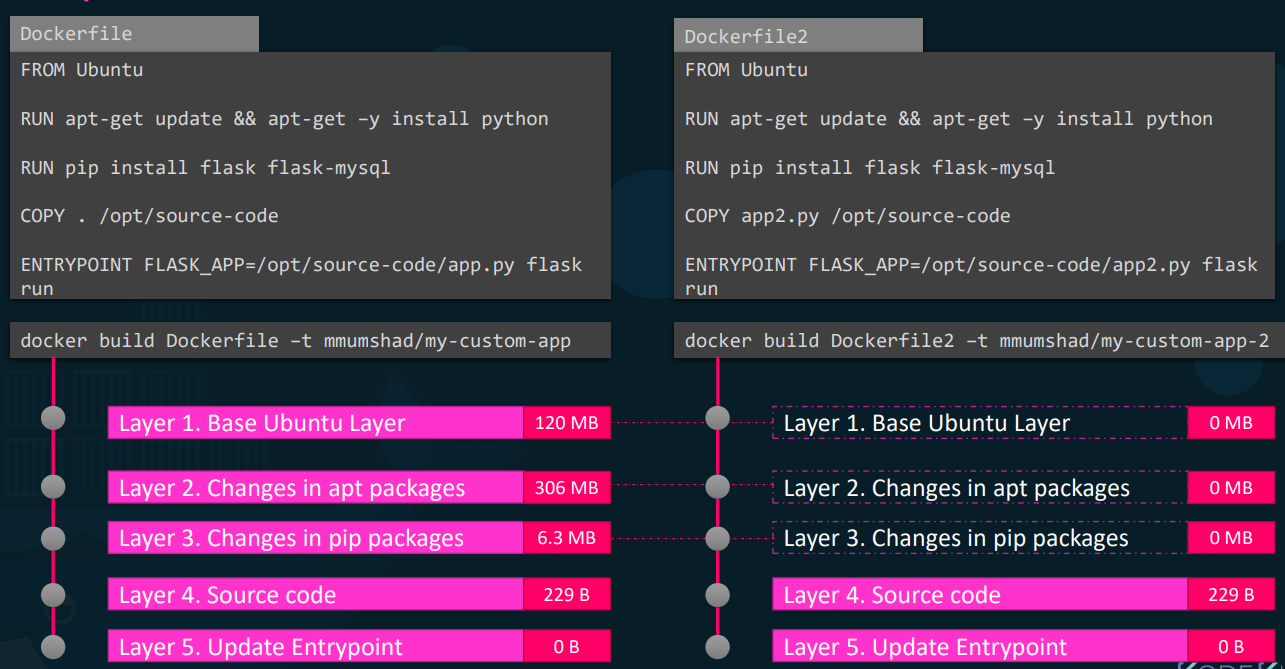
How Images are Built: Every single instruction line inside a
Dockerfilegenerates a distinct new layer. -
Background Mechanism: Each layer strictly contains only the delta (the changes) from the layer immediately below it.
- Example Stack: Base OS (Layer 1) -> Packages (Layer 2) -> Dependencies (Layer 3) -> Source Code (Layer 4) -> Entrypoint (Layer 5).
-
Properties: All image layers are immutable and strictly read-only once the build completes.
-
Practical Advantage (Caching): If you build a new application using the same base OS and dependencies, Docker does not rebuild the foundation. It reuses the identical layers from the local cache and only builds the new top layers (like the new source code). This drastically reduces disk space and rebuild time.
The Container Writable Layer
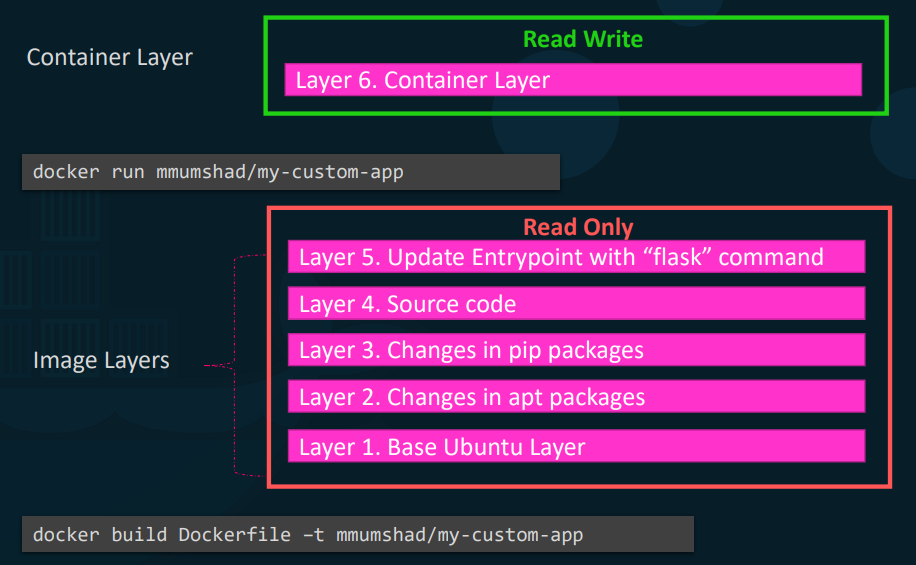
Section titled “The Container Writable Layer”- How it Works: When you execute
docker run, Docker takes the read-only image stack and provisions a thin, read-write layer entirely on top of it. - Purpose: This layer captures all runtime state changes: log files, temporary files, and user modifications.
- Lifecycle: This writable layer is entirely ephemeral. When the container is destroyed, this layer—and all data within it—is permanently deleted.
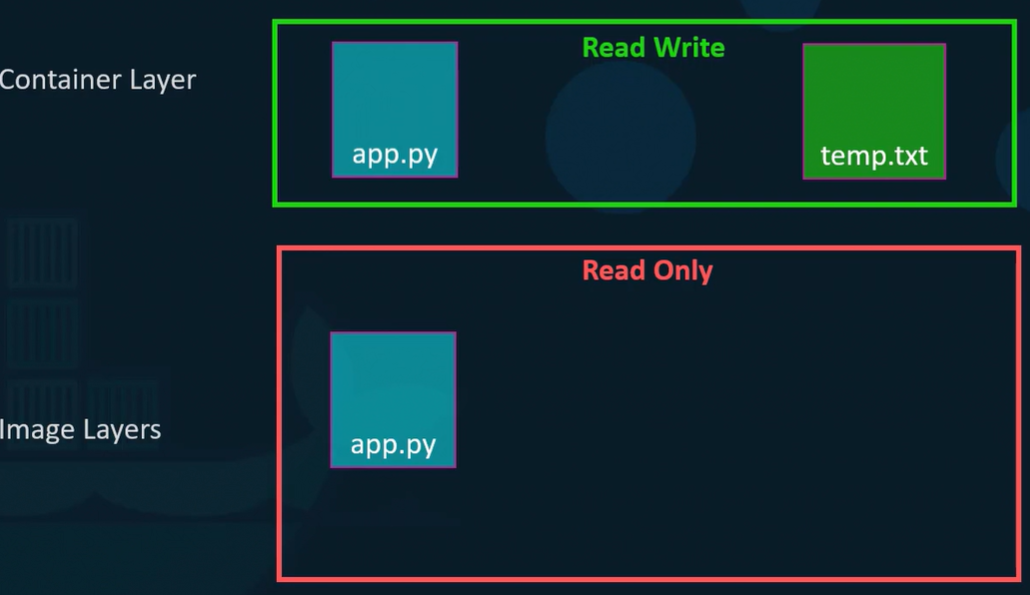
Copy-on-Write Mechanism in Practice
Section titled “Copy-on-Write Mechanism in Practice”-
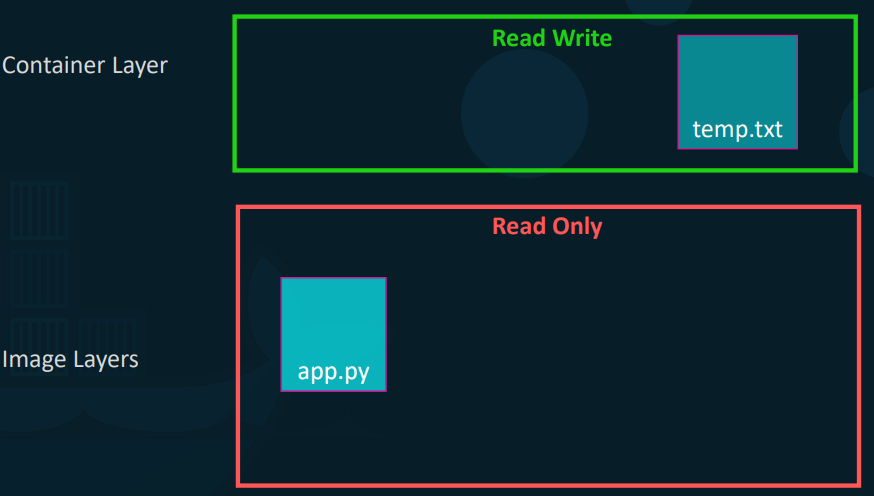
The Problem: Image layers are read-only, but what if a running container needs to modify an existing file (like an
app.pyscript baked into the image)? -
Background Process:
- Docker intercepts the modification request.
- It locates the file in the lower read-only layers.
- It copies that specific file up into the ephemeral read-write container layer.
- You apply your modifications to this copy. The original image layer file remains completely untouched.
Eg: in the below setup you want to edit app.py which is part of image layers.. then docker copy that file to writable layer.. i.e container layer.. then whatevr chnages you made in the app.py stored tewmporaly in the container runtime and vanished after container lifecycle to prevent this use volumes
Persistent Storage: Volume Mounts
Section titled “Persistent Storage: Volume Mounts”- Bypasses the ephemeral container layer to store data (like databases) permanently on the host machine.
- How it Works in the Background: Volumes are stored specifically within Docker’s managed directory structure (
/var/lib/docker/volumes). - Commands:
- Explicit Creation:
docker volume create data_volume - Mounting:
docker run -v data_volume:/var/lib/mysql mysql(Mounts the named volume into the container’s expected data path). - Implicit Creation: If you skip creation and immediately run
docker run -v new_volume:/target, the Docker daemon detects the missing volume and automatically creates it for you before starting the container.
- Explicit Creation:
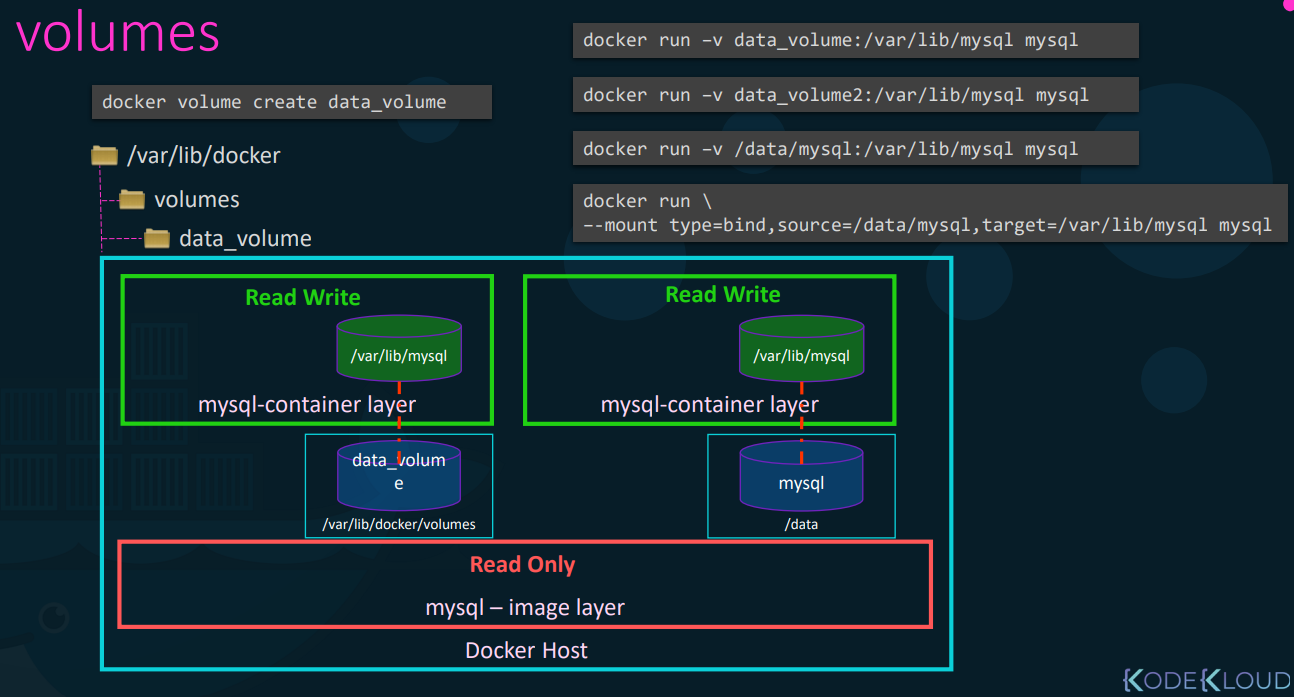
Persistent Storage: Bind Mounts
Section titled “Persistent Storage: Bind Mounts”- Concept: Instead of using Docker’s default managed volume folder, you mount a highly specific, existing directory from anywhere on your host OS / Docker Host.
- Command:
docker run -v /data/mysql:/var/lib/mysql mysql(Note the absolute file path/data/mysqlinstead of a simple volume name).
Key Difference: Volume mounts are managed by the Docker daemon; Bind mounts rely entirely on the host machine’s specific directory structure and permissions.
The Modern -mount Option
Section titled “The Modern -mount Option”- Concept: While
vworks, it is older syntax.-mountis the modern, preferred standard because it uses explicit key-value pairs, reducing syntax errors. - Command Equivalent:
docker run --mount\ type=bind,source=/data/mysql,target=/var/lib/mysql mysql
| Feature | Volume Mount | Bind Mount |
|---|---|---|
| Storage Location | Managed entirely by Docker (specifically inside /var/lib/docker/volumes/). | Anywhere on the host OS file system. |
| Creation | The Docker daemon creates and manages it (either automatically or via docker volume create). | You must explicitly provide an exact, absolute path to an existing directory on the host. |
| Host Dependency | Completely decoupled from the host OS directory structure and host permissions. | Tightly coupled to the host OS directory structure and strictly relies on host file permissions. |
| Best Use Case | Safely persisting database data or sharing data seamlessly between multiple containers. | Sharing live source code or configuration files from the host to the container during active development. |
Legacy Syntax (-v) | -v my_volume:/var/lib/mysql | -v /path/on/host:/var/lib/mysql |
Modern Syntax (--mount) | --mount type=volume,source=my_volume,target=/var/lib/mysql | --mount type=bind,source=/path/on/host,target=/var/lib/mysql |
Storage Drivers (The Engine Behind the Scenes)
Section titled “Storage Drivers (The Engine Behind the Scenes)”- The storage driver (e.g., AUFS, Overlay2, DeviceMapper, Btrfs, VFS) is the actual background software component doing the heavy lifting.
- It executes the layered architecture, provisions the writable layer, and handles the physical file movements required by copy-on-write.
- Automated Selection: Docker intelligently assigns the optimal driver based on your host OS (e.g., AUFS or Overlay2 for Ubuntu, DeviceMapper for RedHat/CentOS).
Example Lab
Section titled “Example Lab”# Step 1: Create the named volumepavan_bandaru@epam~> docker volume create my_ubuntu_homemy_ubuntu_home
# Step 2: Verify the volume directory exists in the Docker storage root on the hostpavan_bandaru@epam~> sudo ls /var/lib/docker/volumes33b6cdd28099f5156cb897618af09f31a77b9d8c6db57cc75a482f2bfff2217736c78869a4a0f17b2c89502bf2b50e61ea0c6ca6a79d0f3ffafe0c5d98b8134a446be63ca1e673e933fb3c3a2a1b1d3eb90a80200214ff56d6da0bfc2b74ed005ab9c2a3670838396a681e076ac62f4265fb0fbd79e4c818c67b2c05f1e152a7backingFsBlockDevcbe1bfbf282cb1af4a38583608fb684a1e1e71aa0fafa5186e2783b582858620metadata.dbmy_ubuntu_home
# Step 3: Inspect the '_data' subdirectory (the actual mount point on the host) & List pre-existing files in the volume data directorypavan_bandaru@epam~> sudo ls /var/lib/docker/volumes/my_ubuntu_home/_datafile_1 file_2 file_3 file_4 file_5
# Step 4: Run a container and MOUNT the host volume to a path inside the containerpavan_bandaru@epam~> docker run -it -v my_ubuntu_home:/home/ubuntu d1e2e92c075eroot@a7b9bf00d116:/# ls /home/ubuntu/file_1 file_2 file_3 file_4 file_5root@a7b9bf00d116:/# exitexit
# Step 5: Run a container WITHOUT the volume to verify data isolationpavan_bandaru@epam~> docker run -it d1e2e92c075eroot@18e8705a8dc9:/# ls /home/ubuntu/root@18e8705a8dc9:/# exitexit