Code Quality : SonarQube
1. Introduction to Code Quality
Section titled “1. Introduction to Code Quality”Inspecting code continuously is a best practice in modern software development. The goal is to scan for defects at every production stage.
Quality Gate — A set of criteria that determines whether a project is ready to proceed to the next stage of the software lifecycle.
2. What is SonarQube?
Section titled “2. What is SonarQube?”SonarQube is an open-source platform for continuous testing of code quality. It performs static code analysis and produces detailed reports on:
- Bugs
- Code smells
- Vulnerabilities
- Code duplications
Key facts:
- Written in Java, but supports analysis of 20+ programming languages
- Maintained by SonarSource
- Extended by 50+ plugins
- Language support varies depending on the edition in use
The 7 Axes of Code Quality (SonarQube)
Section titled “The 7 Axes of Code Quality (SonarQube)”- Architecture and Design
- Duplications
- Unit Tests
- Potential Bugs
- Complexities
- Coding Standards / Rules
- Comments
3. How SonarQube Works
Section titled “3. How SonarQube Works”SonarQube ingests and analyzes source files, then:
- Generates a set of metrics
- Stores them in a database
- Displays them on a dashboard
This recursive/continuous approach helps evaluate code quality and track how the codebase evolves over time. For example, you can view Coverage (~91.5%) and Unit Test counts per analysis run.
Note: Sonar has many capabilities typically configured by the dev/test team. The DevOps role is to spin up and integrate SonarQube. Implementing gates and rules is the responsibility of the dev/test team.
4. Benefits of SonarQube
Section titled “4. Benefits of SonarQube”Detects and Alerts Automatically detects bugs and prompts developers to fix them before production. Also highlights complex code areas not covered by unit tests.
Sustainability Eliminates complexities, duplications, and potential defects. Ensures clean architecture and increases unit tests, extending the lifespan of applications.
Productivity Helps teams spot and eliminate code duplications and redundancy, reducing application size, complexity, maintenance time, and cost.
Raise Quality Provides multidimensional analysis across all 7 quality axes. Avoids duplicate code, keeps complexity low, detects violations, enforces coding standards, and documents APIs. Developers can build a customizable dashboard with filters.
Sharpen Developers’ Skills Provides regular feedback on quality issues, helping developers hone their programming skills and improve transparency in the code they write.
Scale With Business Needs Designed to scale without known limits. Tested at scale — analyzing over 5,000 projects with 4+ million lines of code and 20+ developers daily.
Enable Continuous Code Quality Management Makes code quality part of the development process itself. Ongoing monitoring increases software quality while reducing management costs and risks.
5. Architecture Overview
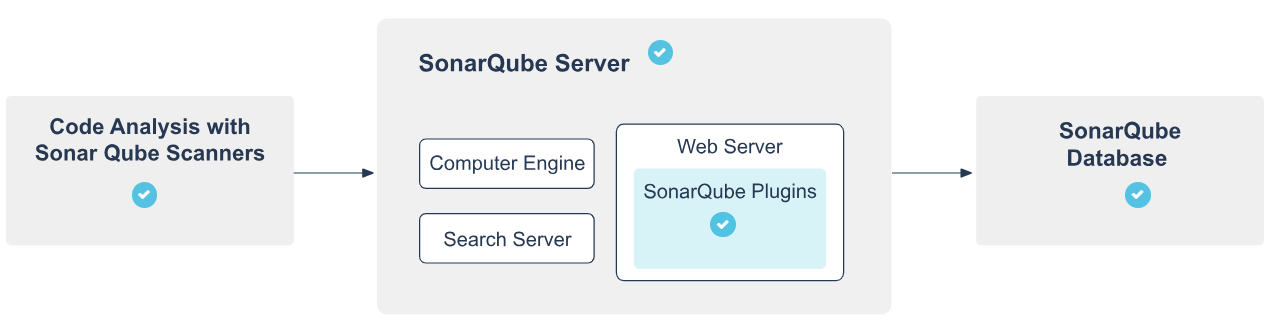
Section titled “5. Architecture Overview”The SonarQube platform consists of four components:
5.1 SonarScanners
Section titled “5.1 SonarScanners”- One or more scanners running on your Build/CI servers
- Responsible for analyzing project code
5.2 SonarQube Server
Section titled “5.2 SonarQube Server”Runs three main processes:
- Web Server — for developers and managers to browse quality snapshots and configure the instance
- Search Server — based on Elasticsearch, backs UI searches
- Compute Engine Server — processes code analysis reports and saves them to the SonarQube database
5.3 SonarQube Plugins
Section titled “5.3 SonarQube Plugins”Multiple plugins installed on the server covering language support, SCM integration, authentication, and governance.
5.4 SonarQube Database
Section titled “5.4 SonarQube Database”Stores:
- Configuration of the SonarQube instance (security, plugins, settings)
- Quality snapshots of projects, views, etc.
6. Integration with ALM Tools
Section titled “6. Integration with ALM Tools”SonarQube integrates into the broader CI/CD pipeline as follows:
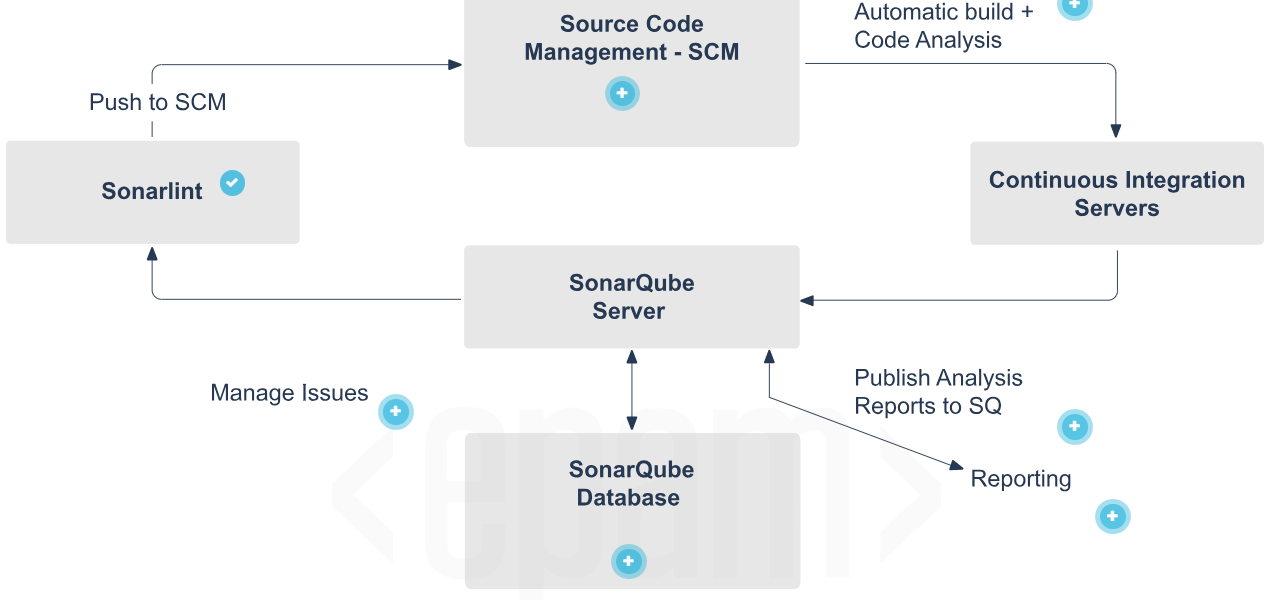
SonarLint- One SonarQube Server starting three main processes:- Developers code in their IDEs and use SonarLint to run a local analysis.
Manage Issues- Developers use the SonarQube UI to manage and reduce their technical debt by reviewing, commenting on, and challenging their issues.
SCM- Developers push their code into their favorite SCM: Git, SVN, TFVC, etc.
Automatic Build and Code Analysis- SonarQube analysis requires the execution of the SonarScanner, which is triggered by the continuous integration server.
SonarQube Database- The analysis report results are processed and stored in the SonarQube database, and the results are displayed in the UI by the SonarQube server.
Analysis Report- The analysis report is sent to the SonarQube server for processing.
Reports- Managers receive the results of the analysis in the form of reports. APIs are used by Ops to automate SonarQube configuration and data extraction. The SonarQube server is monitored by Ops using JMX.
7. Integration Constraints and Limitations
Section titled “7. Integration Constraints and Limitations”- Only one SonarQube server and one SonarQube database per platform (server can be installed in a cluster)
- Each component (server, database, scanners) should be on its own dedicated machine for optimal performance
- SonarScanners scale by adding machines
- All machines must be time-synchronized
- SonarQube Database and SonarQube Server must be on the same network
- SonarQube Server and SonarScanners do not need to be on the same network
- There is no direct communication between SonarScanners and the SonarQube database
8. Installation
Section titled “8. Installation”8.1 Prerequisites
Section titled “8.1 Prerequisites”Only hard prerequisite: Java (Oracle JRE 11 or OpenJDK 11)
Hardware Requirements:
- Minimum 2GB RAM, with at least 1GB free RAM (for small-scale instances)
- Disk space depends on the volume of code analyzed
- Requires high read/write speed drives — especially for the
datafolder (Elasticsearch indices) - 32-bit systems are NOT supported on the server side (supported on scanner side)
Software Requirements:
- Java: JVM versions 8 or 11 for scanners; version 11 required for the server
- Databases (one of):
- PostgreSQL 12, 11, 10, 9.3–9.6
- Microsoft SQL Server 2017, 2016, 2014
- Oracle 19C, 18C, 12C, 11G, XE Editions
- Linux kernel settings:
vm.max_map_count>= 524288fs.file-max>= 131072- User must be able to open at least 131072 file descriptors
- User must be able to open at least 8192 threads
- Fonts:
fontconfigand a FreeType font package (e.g.,libfreetype6) must be installed
seccomp filter note (Linux): Elasticsearch uses seccomp by default. If your distribution doesn’t support it (e.g., Red Hat Linux 6), disable it explicitly:
sonar.search.javaAdditionalOpts=-Dbootstrap.system_call_filter=falseCheck seccomp availability with:
$ grep SECCOMP /boot/config-$(uname -r)8.2 Installing from ZIP File
Section titled “8.2 Installing from ZIP File”- Download and unzip the distribution
- Create a dedicated user account for SonarQube
$SONARQUBE-HOME= path to the unzipped directory- Edit
$SONARQUBE-HOME/conf/sonar.propertiesto configure database settings - For Oracle: copy the JDBC driver into
$SONARQUBE-HOME/extensions/jdbc-driver/oracle - Configure Elasticsearch storage paths:
sonar.path.data=/var/sonarqube/datasonar.path.temp=/var/sonarqube/temp- Start the web server (default port:
9000, default path:/):- Linux/Mac:
bin/<OS>/sonar.sh start - Windows:
bin/windows-x86-64/StartSonar.bat
- Linux/Mac:
8.3 Installing from Docker Image
Section titled “8.3 Installing from Docker Image”Create volumes first to prevent data loss on upgrades:
docker volume create --name sonarqube_datadocker volume create --name sonarqube_extensionsdocker volume create --name sonarqube_logsUse volumes, not bind mounts. Bind mounts prevent plugins and languages from populating properly.
For Oracle databases, add the JDBC driver manually:
- Start the container with the embedded H2 database:
docker run --rm \\ -p 9000:9000 \\ -v sonarqube_extensions:/opt/sonarqube/extensions \\ <image_name>- Exit once SonarQube has started
- Copy the Oracle driver into
sonarqube_extensions/jdbc-driver/oracle
Run SonarQube with your database:
docker run -d --name sonarqube \\ -p 9000:9000 \\ -e SONAR_JDBC_URL=... \\ -e SONAR_JDBC_USERNAME=... \\ -e SONAR_JDBC_PASSWORD=... \\ -v sonarqube_data:/opt/sonarqube/data \\ -v sonarqube_extensions:/opt/sonarqube/extensions \\ -v sonarqube_logs:/opt/sonarqube/logs \\ <image_name>Deprecated:
SONARQUBE_JDBC_USERNAME,SONARQUBE_JDBC_PASSWORD,SONARQUBE_JDBC_URL— stop using these in new setups.
9. Installing Plugins
Section titled “9. Installing Plugins”Option 1 — Marketplace (requires internet access)
Section titled “Option 1 — Marketplace (requires internet access)”- Go to Administration > Marketplace
- Find the plugin and click Install
- Once downloaded, click Restart to apply
Option 2 — Manual Installation (no internet)
Section titled “Option 2 — Manual Installation (no internet)”- Download the plugin
.jarfrom its dedicated page (e.g., SonarPython) - Replace any previous version in
$SONARQUBE_HOME/extensions/plugins - Restart the SonarQube server
10. SonarScanner
Section titled “10. SonarScanner”SonarScanner is a client application that runs project analysis and sends results to the SonarQube server.
10.1 Project Configuration
Section titled “10.1 Project Configuration”Create sonar-project.properties in your project root:
# Required — must be unique per SonarQube instancesonar.projectKey=my:project
# Optional#sonar.projectName=My project#sonar.projectVersion=1.0#sonar.sources=.#sonar.sourceEncoding=UTF-8
10.2 Running from ZIP File
Section titled “10.2 Running from ZIP File”- Unzip to a directory (
$install_directory) - Edit
$install_directory/conf/sonar-scanner.propertiesto point to your server:
#sonar.host.url=http://localhost:9000- Add
$install_directory/binto your PATH - Verify installation:
sonar-scanner -h- Run from your project’s base directory:
sonar-scanner10.3 Running from Docker Image
Section titled “10.3 Running from Docker Image”docker run \\ --rm \\ -e SONAR_HOST_URL="<http://$>{SONARQUBE_URL}" \\ -v "${YOUR_REPO}:/usr/src" \\ sonarsource/sonar-scanner-cli11. SonarScanner for Maven
Section titled “11. SonarScanner for Maven”Recommended default analyzer for Maven projects. Runs as a regular Maven goal — no separate runner setup needed.
Prerequisites: Maven 3.x, Java version supported by your SonarQube server
Global Settings (settings.xml at $MAVEN_HOME/conf or ~/.m2):
Section titled “Global Settings (settings.xml at $MAVEN_HOME/conf or ~/.m2):”<settings> <pluginGroups> <pluginGroup>org.sonarsource.scanner.maven</pluginGroup> </pluginGroups> <profiles> <profile> <id>sonar</id> <activation> <activeByDefault>true</activeByDefault> </activation> <properties> <sonar.host.url><http://myserver:9000></sonar.host.url> </properties> </profile> </profiles></settings>Running Analysis:
Section titled “Running Analysis:”mvn clean verify sonar:sonarFor multi-module projects:
mvn clean installmvn sonar:sonarTo specify a plugin version explicitly:
mvn org.sonarsource.scanner.maven:sonar-maven-plugin:3.7.0.1746:sonarGenerate coverage reports before running analysis to include coverage data.
Overriding Analysis Properties (in pom.xml):
Section titled “Overriding Analysis Properties (in pom.xml):”<properties> <sonar.buildString> [...] </sonar.buildString></properties>12. SonarScanner for Jenkins
Section titled “12. SonarScanner for Jenkins”Installation
Section titled “Installation”- Install via Jenkins Update Center
- Go to Manage Jenkins > Configure System
- Add your SonarQube server details under the SonarQube configuration section
- Create the server authentication token as a “Secret Text” credential
12.1 For .NET (MSBuild)
Section titled “12.1 For .NET (MSBuild)”Global Configuration:
- Go to Manage Jenkins > Global Tool Configuration
- Click Add SonarScanner for MSBuild
- Enable Install automatically to auto-install on Jenkins executors
Job Configuration:
- In Build section, add SonarQube for MSBuild - Begin Analysis
- Set Project Key, Name, and Version
- Add MSBuild build step
- Add SonarQube for MSBuild - End Analysis
12.2 For Java (Maven/Gradle)
Section titled “12.2 For Java (Maven/Gradle)”Global Configuration:
- Go to Manage Jenkins > Configure System
- In SonarQube servers section, check Enable injection of SonarQube server configuration as build environment variables
Job Configuration:
- In Build Environment, enable Prepare the SonarScanner environment
- Use injected environment variables in your build steps:
- Maven goal:
$SONAR_MAVEN_GOAL - Gradle task:
sonarqube
- Maven goal:
12.3 Using a Jenkins Pipeline
Section titled “12.3 Using a Jenkins Pipeline”Use the withSonarQubeEnv step to select and connect to your SonarQube server.
MSBuild Example:
node { stage('SCM') { git '<https://github.com/foo/bar.git>' } stage('Build + SonarQube analysis') { def sqScannerMsBuildHome = tool 'Scanner for MSBuild 4.6' withSonarQubeEnv('My SonarQube Server') { bat "${sqScannerMsBuildHome}\\\\SonarQube.Scanner.MSBuild.exe begin /k:myKey" bat 'MSBuild.exe /t:Rebuild' bat "${sqScannerMsBuildHome}\\\\SonarQube.Scanner.MSBuild.exe end" } }}Replace
batwithshfor Unix-based Jenkins slaves.
SonarScanner Example:
node { stage('SCM') { git 'https://github.com/foo/bar.git' } stage('SonarQube analysis') { def scannerHome = tool 'SonarScanner 4.0' withSonarQubeEnv('My SonarQube Server') { sh "${scannerHome}/bin/sonar-scanner" } }}SonarScanner for Gradle Example:
node { stage('SCM') { git 'https://github.com/foo/bar.git' } stage('SonarQube analysis') { withSonarQubeEnv() { // Picks the global server connection configured in Jenkins sh './gradlew sonarqube' } }}SonarScanner for Maven Example:
node { stage('SCM') { git 'https://github.com/foo/bar.git' } stage('SonarQube analysis') { withSonarQubeEnv(credentialsId: 'f225455e-ea59-40fa-8af7-08176e86507a', installationName: 'My SonarQube Server') { sh 'mvn org.sonarsource.scanner.maven:sonar-maven-plugin:3.7.0.1746:sonar' } }}13. Pausing Pipeline Until Quality Gate Is Computed
Section titled “13. Pausing Pipeline Until Quality Gate Is Computed”The waitForQualityGate step holds the pipeline until SonarQube finishes analysis and returns the quality gate status.
Prerequisites
Section titled “Prerequisites”- Configure a webhook in SonarQube pointing to
<your Jenkins instance>/sonarqube-webhook/ - Use
withSonarQubeEnvin your pipeline so the SonarQubetaskIdis correctly attached to the pipeline context
The step is lightweight — it does not occupy a node for polling and survives Jenkins restarts. To avoid race conditions, it makes a direct call to the server on start (or restart) to check if the task already completed.
Basic Declarative Pipeline Example:
Section titled “Basic Declarative Pipeline Example:”pipeline { agent any stages { stage('SCM') { steps { git url: 'https://github.com/foo/bar.git' } } stage('Build && SonarQube analysis') { steps { withSonarQubeEnv('My SonarQube Server') { withMaven(maven:'Maven 3.5') { sh 'mvn clean package sonar:sonar' } } } } stage('Quality Gate') { steps { timeout(time: 1, unit: 'HOURS') { // abortPipeline: true → fails the pipeline if Quality Gate fails // abortPipeline: false → marks pipeline UNSTABLE instead waitForQualityGate abortPipeline: true } } } }}Multiple Analyses in One Pipeline:
Section titled “Multiple Analyses in One Pipeline:”When running multiple analyses, alternate each analysis stage with its own Quality Gate stage in order:
pipeline { agent any stages { stage('SonarQube analysis 1') { steps { sh 'mvn clean package sonar:sonar' } } stage('Quality Gate 1') { steps { waitForQualityGate abortPipeline: true } } stage('SonarQube analysis 2') { steps { sh 'gradle sonarqube' } } stage('Quality Gate 2') { steps { waitForQualityGate abortPipeline: true } } }}Configuring a Webhook Secret
Section titled “Configuring a Webhook Secret”You can add a secret to your SonarQube webhook to verify the payload sent to Jenkins.
To use a webhook secret at the project level, add it to Jenkins and call waitForQualityGate with the secret ID:
// Declarative pipelinewaitForQualityGate(webhookSecretId: 'yourSecretID')
// Scripted pipelinewaitForQualityGate webhookSecretId: 'yourSecretID'
14. Jenkins Integration — Additional Notes
Section titled “14. Jenkins Integration — Additional Notes”SonarScanners running in Jenkins can automatically detect branches, merge requests, and pull requests — no need to pass branch details explicitly.
Required Jenkins Plugins
Section titled “Required Jenkins Plugins”- Bitbucket, GitHub, or GitLab branch source plugin (depending on your ALM)
- SonarQube Scanner plugin
Single-Branch Pipeline Jobs
Section titled “Single-Branch Pipeline Jobs”- Community Edition supports analyzing one branch only
Multibranch Pipeline Jobs
Section titled “Multibranch Pipeline Jobs”- Available from Developer Edition onwards
- Environment variables in multibranch pipeline jobs are used to auto-configure branch and pull request details
- Jenkins plugins export the information needed to set these variables
Detecting Changed Code in Pull Requests
Section titled “Detecting Changed Code in Pull Requests”SonarScanners need access to the target branch to detect changed code in a pull request. If your Jenkins pull request discovery strategy only fetches the PR (without merging it), the target branch won’t be available locally, and you may see this warning in scanner logs:
File '[name]' was detected as changed but without having changed linesFix this by changing the discovery strategy or manually fetching the target branch before running SonarScanner:
git fetch +refs/heads/${CHANGE_TARGET}:refs/remotes/origin/${CHANGE_TARGET}