Docker Commands & Concepts Cheat Sheet
1. General Info & System Status
Section titled “1. General Info & System Status”Get necessary information and versions for troubleshooting and configuration.
docker --version: Shows the basic Docker version.docker version: Detailed version info for both client and server.- Format specific keys:
docker version --format '{{.Server.Version}}'ordocker version --format '{{json .}}'
- Format specific keys:
docker info: System-wide information (containers running, images, hardware).- Format to JSON:
docker info --format '{{json .}}
- Format to JSON:
2. Working with Images
Section titled “2. Working with Images”Images are the blueprints for containers. Note: You cannot remove an image if a stopped/running container is currently relying on it. Delete the container first.
docker images(ordocker image ls): List all local images.docker pull <image>:<tag>: Download an image from a registry. (Default tag islatest).docker rmi <image_id/name>: Remove an image. Addfto force delete (though stopping the container first is best practice).docker build -t <name>:<tag> .: Build an image from a Dockerfile in the current directory (.).docker history <image>: Show the history/layers of an image (better thancommitto see how an image was built).docker import: Create an image from a tarball.docker save <image> > file.tar: Save an image to a tar archive stream (includes parent layers and tags).docker load < file.tar: Load an image from a tar archive.
Image Tagging
Section titled “Image Tagging”Tags help group images by version. Names can contain lowercase letters, digits, _, ., and -. Max length is 128 chars.
docker tag <source_image> <target_image>:<tag>: General syntax.- Tag by ID:
docker tag 0e5574283393 fedora/httpd:version1.0 - Tag by Name:
docker tag httpd fedora/httpd:version1.0(Defaults tolatestsource). - Tag for Private Registry:
docker tag 0e5574283393 myregistry:5000/fedora/httpd:v1
3. Container Lifecycle & Execution
Section titled “3. Container Lifecycle & Execution”Why does docker run ubuntu exit immediately? Containers are not full operating systems. If there is no active foreground process running inside, the container goes to an EXIT state. (e.g., docker run ubuntu sleep 5 will wait 5 seconds, then exit).
docker ps(ordocker container ls): List currently running containers.docker ps -a: List all containers (running and stopped).docker run <image>: Create and start a container.docker stop <container>: Gracefully terminate a container (sendsSIGTERM).docker start <container>: Start a stopped container.docker rm <container>: Delete a container.docker rename <old_name> <new_name>: Rename a container.docker exec <container> <command>: Run a command inside an already running container (e.g.,docker exec web_app cat /etc/hosts).docker logs <container>: View the output/logs of a container.docker inspect <container/image>: Output low-level JSON details about a container/image.
Attached vs. Detached Mode
Section titled “Attached vs. Detached Mode”- Attached (Foreground):
docker run <image>(Locks up your terminal). - Detached (Background):
docker run -d <image>(Runs in bg, prints container ID). - Re-attach:
docker attach <container_id>(Brings a detached container to the foreground).
Saving Container State (Docker Commit)
Section titled “Saving Container State (Docker Commit)”Creates a new image from a container’s current file system. Note: This only saves filesystem changes. It does not save active memory, network states, or running processes.
docker commit <container_id> new_name:tag
4. Docker run Command
Section titled “4. Docker run Command”Mastering the run command flags is essential for configuration.
d: Run in background (detached).p host_port:container_port: Map a specific port (e.g.,p 8080:80).P: Publish all exposed ports to random available host ports.i: Keep STDIN open (Interactive mode).t: Allocate a pseudo-TTY. (Note:itcombined gives you proper terminal formatting, prompts, colors, arrow keys, and Ctrl+C handling).v host_dir:container_dir: Bind mount a volume for data persistence (e.g.,v /mydata:/var/lib/mysql).e KEY="value": Set environment variables.-rm: Automatically delete the container when it stops.-name: Assign a custom name to the container.-restart: Apply a restart policy (see below).-label: Set metadata on a container.-log-driver: Specify the log driver.u: Set username or UID.w: Override the working directory inside the container.-entrypoint: Overwrite the default ENTRYPOINT of the image.
Restart Policies (-restart)
Section titled “Restart Policies (-restart)”Used to keep unstable applications running or ensure containers boot up when the Docker daemon starts.
-restart no(Default): Do not automatically restart the container under any circumstances.-restart always: Always restart the container if it stops, regardless of the exit code. It will also automatically start when the Docker daemon boots up.-restart unless-stopped: Same asalways, except it will not restart on daemon boot if the container was manually stopped by the user before the daemon went down.-restart on-failure[:max-retries]: Only restarts if the container exits with a non-zero (error) status. You can optionally limit retry attempts (e.g.,-restart on-failure:5).
5. Docker Hub & Registries
Section titled “5. Docker Hub & Registries”docker login: Log into a registry (defaults to Docker Hub).docker logout: Log out of the registry.docker search <term>: Search Docker Hub for images.docker push [registy/username]/<image>:<tag>: Upload an image from your local machine to a registry.
6. Dockerfile Instructions
Section titled “6. Dockerfile Instructions”A Dockerfile is a text document containing all the commands to assemble an image.
| Instruction | Explanation | Example |
|---|---|---|
FROM | Sets the base OS/image for subsequent instructions. | FROM ubuntu:20.04 |
RUN | Executes commands in a new layer and commits the results. | RUN apt-get update && apt-get install -y vim |
CMD | Provides default arguments/commands for an executing container. | CMD ["python", "app.py"] |
EXPOSE | Documents which ports the container listens on (does not publish them). | EXPOSE 8080 |
ENV | Sets an environment variable inside the container. | ENV APP_ENV=production |
ADD | Copies files/dirs. Can extract tarballs and download URLs. | ADD https://example.com/data.tar.gz /app/ |
COPY | Copies files/dirs from host to container. (Preferred over ADD for local files). | COPY ./src /app/src |
ENTRYPOINT | Configures a container that will run as an executable. | ENTRYPOINT ["nginx", "-g", "daemon off;"] |
VOLUME | Creates a mount point for external host volumes. | VOLUME /var/lib/mysql |
USER | Sets the UID/Username for the following RUN/CMD/ENTRYPOINT commands. | USER nodejs_user |
WORKDIR | Sets the working directory for subsequent instructions. | WORKDIR /usr/src/app |
ARG | Defines a build-time variable (not available after the image is built). | ARG VERSION=latest |
ONBUILD | Adds a trigger that execuqtes when this image is used as a FROM base for another. | ONBUILD COPY . /app/src |
STOPSIGNAL | Sets the system call signal sent to the container to exit. | STOPSIGNAL SIGKILL |
LABEL | Applies key/value metadata to the image. | LABEL maintainer="admin@site.com" |
⚠️ Core Difference between COPY and ADD: COPY is basic and strictly copies local files/directories from your host into the container. ADD is more powerful; it can copy remote file URLs and automatically extract/unzip .tar files into the container. (Best practice: Use COPY unless you explicitly need ADD’s extraction/URL features).
ENTRYPOINT vs CMD
Section titled “ENTRYPOINT vs CMD”The difference lies entirely in how they handle extra arguments passed at the end of a docker run command.
CMD(The Overridable Default): Provides a default command and arguments. If a user types a command afterdocker run, it completely replaces theCMD.- Dockerfile:
CMD ["sleep", "10"] - Run:
docker run my_app sleep 100➔ Executessleep 100(original is ignored).
- Dockerfile:
ENTRYPOINT(The Fixed Executable): Defines a command that must execute. Any extra arguments passed duringdocker runare appended to it, not replaced.- Dockerfile:
ENTRYPOINT ["sleep"] - Run:
docker run my_app 10➔ Executessleep 10.
- Dockerfile:
The Best Practice: Combine Them
Use ENTRYPOINT to lock in the executable, and CMD to provide a fallback argument just in case the user forgets to provide one.
ENTRYPOINT ["sleep"] CMD ["10"]
docker run my_app➔ Executessleep 10(Falls back to CMD).docker run my_app 50➔ Executessleep 50(Overrides CMD, appends to ENTRYPOINT).
7. Storage & Data Persistence
Section titled “7. Storage & Data Persistence”By default, all files created inside a container are stored on a writable container layer. If the container is deleted, the data is lost. Docker provides three ways to mount data to solve this.
The Syntax Debate: v vs -mount
Section titled “The Syntax Debate: v vs -mount”-vor-volume: The older, shorthand syntax. It combines all options into one field separated by colons (host_path:container_path:options). While common among experienced users, the order of fields matters, making it less readable.-mount: The newer, verbose, and recommended syntax. It consists of multiple comma-separated key-value pairs (type=...,source=...,target=...). It is explicit, easier to understand, and the only syntax supported for Swarm services.
A. Bind Mounts
Section titled “A. Bind Mounts”A file or directory on the host machine is mounted into a container. Best used when you want to share source code or specific host configuration files with the container.
-
With
-mount(Recommended):Terminal window docker run -d -it --name nginx --mount type=bind,source=/home/example/nginxlogs,target=/var/log/nginx/ -p 5050:80 nginx -
**With
v:**Explanation: The first field is the host path (/home/example/nginxlogs), the second is the container path (/var/log/nginx). Docker uses a:to split them.Terminal window docker run --name=nginx -d -it -v /home/example/nginxlogs:/var/log/nginx -p 5050:80 nginx
Read-Only Bind Mounts:
Section titled “Read-Only Bind Mounts:”For security, sometimes a container only needs to read data from the host, not modify it.
-
-mountsyntax: Add,readonlyto the list of keys.Terminal window docker run -d -it --name nginx --mount type=bind,source=/home/example/nginxlogs,target=/var/log/nginx/,readonly -p 5050:80 nginx -
vsyntax: Add:roas the third parameter.Terminal window docker run -d -it -v /home/example/nginxlogs:/var/log/nginx:ro nginx
B. Volumes
Section titled “B. Volumes”Volumes are completely managed by Docker (stored in /var/lib/docker/volumes/ on Linux). They are the best choice for persistent data like databases because they isolate the data from the host machine’s core filesystem structure.
-
Start container with a volume: Docker will automatically create the volume if it doesn’t exist.
Terminal window docker run -d -it --name nginx --mount type=volume,source=nginxlogs,target=/var/log/nginx/ -p 5050:80 nginx
Volume Management Commands:
docker volume create <name>: Manually create a new volume.docker volume ls: List all available volumes.docker volume inspect <name>: Display detailed JSON info about a volume (shows exact host mount path).docker volume rm <name>: Delete a specific volume.docker volume prune: Remove all unused local volumes (volumes not attached to any container).
C. tmpfs Mounts
Section titled “C. tmpfs Mounts”tmpfs stands for Temporary File System. Instead of writing to a hard drive, the container writes data directly to the host machine’s RAM.
-
Use Cases: High-security environments where you don’t want secrets written to disk, or high-performance apps that generate massive amounts of non-persistent state data.
-
in syntax Notice there is no
sourcebecause it’s just RAM. Thetmpfs-mode=1770sets specific octal file permissions for that memory block (defaults to 1777 / world-writable). Alternatively, you can use the shortcut flag-tmpfs /var/log/nginx/.Terminal window docker run -d -it --name nginx --mount type=tmpfs,target=/var/log/nginx/,tmpfs-mode=1770 -p 5050:80 nginx
8. System Cleanup (The prune Commands)
Section titled “8. System Cleanup (The prune Commands)”Over time, Docker consumes massive amounts of disk space with dead containers, old images, and orphaned volumes. prune is the best way to systematically clean your environment.
The Core Commands
Section titled “The Core Commands”docker container prune: Removes all stopped containers. (Much safer and easier than manually deleting them one by one).docker image prune: Removes all dangling images (images without a tag, usually leftovers from failed builds, showing as<none>:<none>).docker network prune: Removes all networks not attached to at least one container.docker volume prune: Removes all unused local volumes.docker system prune: The ultimate cleanup. Removes all stopped containers, all dangling images, all unused networks, and all build cache in one sweep.
Crucial Prune Options & Filters
Section titled “Crucial Prune Options & Filters”for-force: Bypasses the “Are you sure?” confirmation prompt. Great for automation scripts.aor-all: (Used heavily with images/system). Instead of just deleting dangling images, this deletes ALL unused images (even tagged ones) that aren’t currently tied to a running or stopped container.- Example:
docker system prune -a --volumes(Wipes the slate completely clean).
- Example:
-filter: Allows surgical cleanup usingkey=valuepairs.- Time-based:
docker container prune --filter "until=24h"(Only deletes stopped containers older than 24 hours). - Label-based:
docker image prune --filter "label=stage=build"(Only deletes unused images that carry that specific metadata label).
- Time-based:
9. Docker Networking
Section titled “9. Docker Networking”Networking allows containers to communicate with each other, the host, and the outside world securely.
Network Drivers
Section titled “Network Drivers”1. Bridge (Default) Creates a private internal network on the host. Containers on the same bridge network can talk to each other via IP or container name. If you don’t specify a network, Docker uses this.
2. Host
Removes network isolation entirely. The container shares the host’s exact IP and networking stack. You do not need to publish ports (-p) because the container binds directly to the host’s ports.
-
Proof of Concept (Host Network):
Terminal window # Start Nginx directly on the host's network stackdocker run -d --network=host --name=nginx nginx# Notice there are no port mappings under the PORTS columndocker ps -l# CONTAINER ID IMAGE COMMAND STATUS PORTS NAMES# 491a46252524 nginx "nginx -g 'daemon of…" Up 2 seconds nginx# docker port shows nothing, because Docker isn't proxying anythingdocker port nginx# But the host machine is directly listening on port 80netstat -natpl | grep :80# tcp 0 0 0.0.0.0:80 0.0.0.0:* LISTEN 25419/nginx: master# Curling the host machine hits the container instantlycurl -sIL localhost | egrep "(HTTP|Server)"# HTTP/1.1 200 OK# Server: nginx/1.15.2
3. Overlay Used for Docker Swarm. Connects multiple Docker daemons together so containers on different physical servers can communicate securely.
4. MacVlan Assigns a real MAC address to a container, making it look like a physical device on your actual router/network. Good for legacy apps that expect to be directly connected to the physical network.
5. Null / None
Completely disables all networking for that container. It gets a loopback interface (lo), but no external IP, no gateway, and no MAC address.
-
Proof of Concept (None Network):
Terminal window # Run a container with no networkdocker run --net=none -d --name inNoneContainer busybox# Inspecting the network settings shows complete isolation (blank IPs and Gateways)docker inspect inNoneContainer | jq '.[0].NetworkSettings.Networks'# "none": {# "Gateway": "",# "IPAddress": "",# "MacAddress": ""# }# Attempting to reach the outside world instantly failsdocker run --network=none busybox ping google.com# ping: google.com: Name or service not known
Network Management Commands
Section titled “Network Management Commands”docker network ls: Lists all networks on the engine.docker network create <network_name>: Creates a new custom bridge network.- Example:
docker network create nginx-network- Docker uses the
bridgedriver by default
- Docker uses the
- You can explicitly set the driver using
--driver(or-d):docker network create -d <driver_name> <network_name>
- Example:
docker network inspect <network_name>: Shows detailed JSON info (including which containers are currently connected to it and their internal IPs).docker network rm <network_name>: Deletes a specific network (fails if containers are still attached).docker network connect <network_name> <container_name>: Attaches a running container to an existing network dynamically.- Example:
docker network connect nginx-network nginx
- Example:
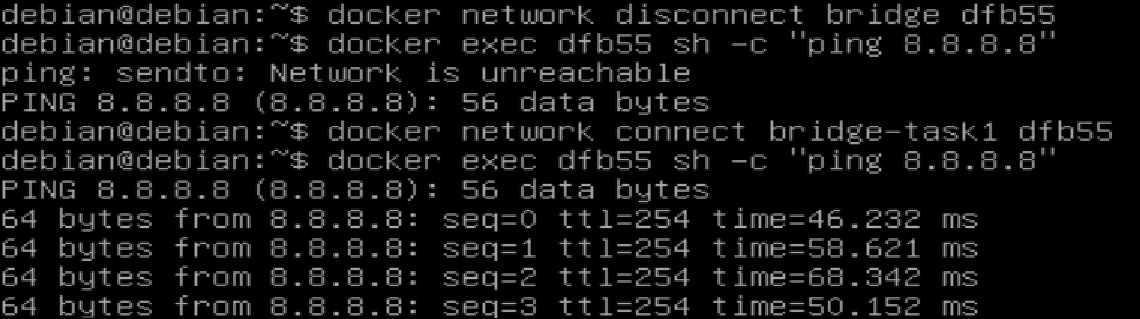
docker network disconnect <network_name> <container_name>: Removes a running container from a network without stopping the container.
10. Docker Compose (Multi-Container Environments)
Section titled “10. Docker Compose (Multi-Container Environments)”Docker Compose is a tool for defining and running multi-container Docker applications using a single YAML file (docker-compose.yml)
The docker-compose.yml Structure
Section titled “The docker-compose.yml Structure”The file typically consists of these core parts. Note: You must specify the exact version at the top, as there is no backward compatibility between Compose versions.
docker compose version(e.g.,'3.8')services(The actual containers)networks(Custom internal networks)volumes(Named persistent storage)configs(External configuration data)
The 6 Steps to Build a Compose Configuration
Section titled “The 6 Steps to Build a Compose Configuration”-
Splitting the App into Services: Break the application into logical tiers (e.g.,
client,server,database).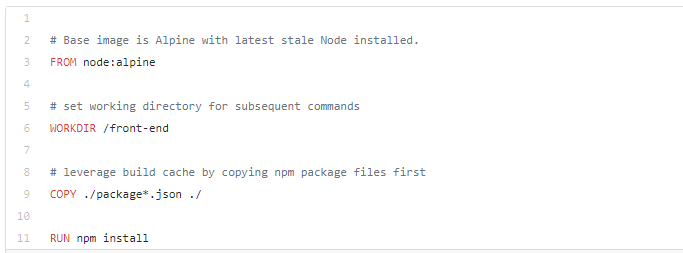
-
Pulling or Building Images: * Use an existing image:
image: "postgres:13"-
Or build from a local Dockerfile:
build: ./server-dir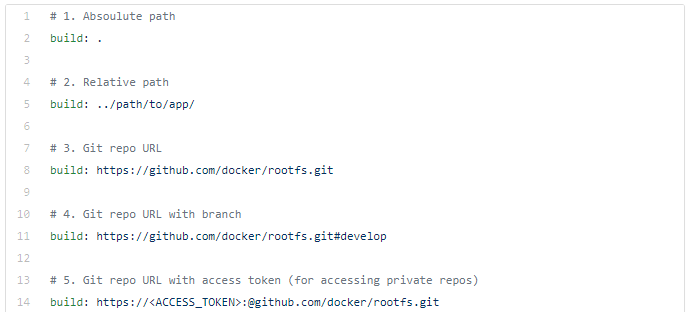
-
-
Configuring Environment Variables: Pass necessary startup data. You can declare them directly in the YAML (
POSTGRES_USER=admin) or load them automatically from a.envfile in the same directory.
-
Configuring Networking: By default, Compose creates an internal network. Containers communicate using their service names (e.g., the client can hit
http://server:8080). Useports:("8080:80") to expose them to the host machine. -
Setting Up Volumes: Declare named volumes under the top-level
volumes:key to persist database data.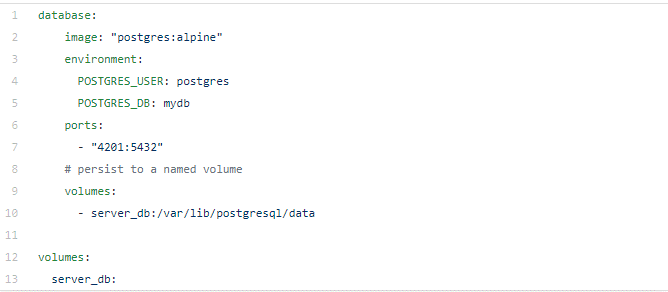
-
Building & Running: Execute
docker-compose buildfollowed bydocker-compose up.
Docker Compose Commands Reference
Section titled “Docker Compose Commands Reference”- installation -
sudo apt install -y docker-compose-plugin && docker compose version
Difference Between docker-compose and docker compose
docker-compose→ older, standalone tool (Python-based)docker compose→ newer, built-in Docker CLI plugin (Go-based, recommended)docker compose lsdocker compose up -d: Creates and starts all containers defined in the YAML in detached mode (background).docker compose ps: Lists containers created specifically by thedocker-compose.ymlin the current directory.docker compose exec <service_name> <command>: Runs arbitrary commands inside a specific service (e.g.,docker compose exec web bash).docker compose images: Lists the local images used by the created containers.docker compose logs: Displays the aggregated log output from all services.docker compose restart: Restarts all stopped and running services without destroying them.docker compose stop: Stops the running containers, but leaves them intact on the system. You can wake them up withdocker compose start.docker compose down: Destroys the containers, networks, and images created byup.- Pro-tip: Add
-volumesto wipe out the persistent data volumes as well.
- Pro-tip: Add
11. Namespaces & Cgroups
Section titled “11. Namespaces & Cgroups”To master Docker, you must understand that containers are not Virtual Machines. There is no hypervisor or guest OS. Containers are simply isolated processes running directly on the Host OS kernel. This isolation is achieved using two core Linux features: Namespaces and Control Groups (Cgroups).
A. Namespaces (Process Isolation)
Section titled “A. Namespaces (Process Isolation)”Rule: Namespaces limit what a process can SEE and USE. They provide a container with its own private view of the system.
- PID: Isolates Process IDs. (PID 1 inside a container might be PID 3455 on the host).
- NET: Manages and isolates network interfaces and IP addresses.
- MNT: Isolates mount points and single-directory hierarchies.
- UTS: Isolates hostnames and domain names.
- IPC: Manages shared memory, message queues, and semaphores.
Namespace Manipulation Examples: Normally, containers cannot see the host’s processes. However, you can force a container to share the host’s PID namespace:
# 1. Start a long process on the hostsleep 1000 &# [1] 19005
# 2. Run a container attached to the host's PID namespace to kill the host process!docker run --pid=host centos kill -9 19005
You can also force one container to share the PID namespace of another container:
# 1. Start a web containerdocker run -d --name=web-container nginx
# 2. Run a temporary CentOS container inside the Nginx container's namespace to view its processesdocker run --rm --pid=container:web-container centos ps
B. Control Groups / Cgroups (Resource Limitation)
Section titled “B. Control Groups / Cgroups (Resource Limitation)”Rule: Cgroups limit how much a process can USE. They restrict the hardware resources (CPU, Memory, Disk I/O, Network) a container can consume so one runaway container doesn’t crash the whole server.
- Memory: Accounts for and limits RAM usage.
- CPU / CPUSet: Limits CPU time or binds a container to a specific CPU core.
- BlkIO: Measures and limits block input/output (disk read/write speeds).
- Freezer: Freezes/unfreezes a group of processes.
- Devices: Controls read/write access to device nodes.
Memory Limit Examples:
Section titled “Memory Limit Examples:”By default, upon execution, a container has no information about other containers or memory limits. It sees all host RAM and considers it all available for itself.
-
Checking Default Memory Usage: You can start a basic container and check its resource consumption using
docker stats.Terminal window docker run -d centos sleep infinityTo view just the memory usage cleanly without continuous streaming:
Terminal window docker stats --no-stream --format "table {{.Container}}\\t{{.MemUsage}}" -
Setting a Hard Limit: Use the
moption to strictly limit the maximum memory the container can use.Terminal window docker run -d -m 300M centos sleep infinity -
Setting a Memory Reservation (Soft Limit / Pre-allocation): The
-memory-reservationoption provides a baseline guarantee (e.g., 100M) for the process. This allows the container to occupy that memory upfront without needing to make continuous calls to the kernel for additional 64M allocations as it grows. This is highly recommended to improve the startup performance of heavy, memory-intensive applications (like Java-based processes).Terminal window docker run -d -m 300M --memory-rese{}{rvation 100M centos sleep infinity
CPU Limit Examples:
Section titled “CPU Limit Examples:”By default, a container can consume 100% of the host’s CPU cycles. You restrict this at runtime using the following flags:
-
Soft Limits (Relative Weight):
-cpu-sharesdictates priority when the host CPU is under heavy load. The default weight is 1024. If Container A has 2048 and Container B has 1024, Container A gets twice as much CPU time only if both are fighting for resources.Terminal window docker run -d --name high_priority --cpu-shares 2048 centos sleep infinity -
Pinning to Specific CPU Cores:
-cpuset-cpusrestricts the container to execute only on specific logical CPU cores.Terminal window docker run -d --name core_restricted --cpuset-cpus="0,1" centos sleep infinity# This container can only process data on Core 0 and Core 1. -
Pinning to Specific Memory Nodes (NUMA architectures):
-cpuset-memsrestricts the container to use memory nodes associated with specific CPUs (useful for high-performance tuning on multi-socket servers).Terminal window docker run -d --name mem_restricted --cpuset-mems="0" centos sleep infinity -
Hard Limits (CFS - Completely Fair Scheduler): This uses a strict ratio of
-cpu-quotato-cpu-period. The default period is 100,000 microseconds (100ms). Setting the quota to 25,000 restricts the container to exactly 25% of a single CPU core.Terminal window docker run -d --name cpu_25_percent --cpu-period=100000 --cpu-quota=25000 centos sleep infinitydocker -
Verifying the Limit: Once running, you can verify the hard limit is working perfectly by checking the live stats:
Terminal window docker stats --no-stream --format "table {{.Name}}\\t{{.CPUPerc}}" cpu_25_percent# NAME CPU %# cpu_25_percent 25.03%